
Gluten Free Brownies

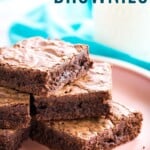


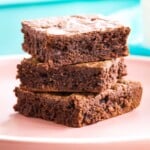
These rich and fudgy gluten-free brownies are one of my favorite baked treats. They’re easy to make and extra chocolatey, with those perfect crackly tops! Mix up the batter in one bowl in just a few minutes.
The hardest part is waiting for your gluten-free brownies to cool down enough to eat. Luckily, these are delicious served warm with chocolate chip ice cream or no-churn dulce de leche ice cream for the ultimate brownie sundae!

Delicious Details
- Cuisine Inspiration: American
- Primary Cooking Method: Oven
- Dietary Info: Gluten-free
- Skill Level: Easy
Why You’ll Love This Gluten-Free Brownies Recipe
Even with the age-old debate of cakey vs. fudgy brownies, crispy end pieces vs. soft middle pieces, I think we can all agree: homemade brownies are the best! Me? I’m firmly Team Fudgy Brownie. And since I’ve been gluten-free, I set out to create the perfectly chewy gluten-free chocolate brownies.
After years of baking this recipe, I’ve found the ideal way to make the best gluten-free bars that are rich and fudgy with that perfectly crackled, shiny top everyone loves. Of course, that means I’m sharing it with you!
- Double the chocolate. First of all, this brownie recipe uses chocolate chips and cocoa powder, unlike some that just use cocoa. Why choose one or the other when you can have both? It’s the high-fat ratio and lack of leavening that make these brownies fudgy instead of cake-like.
- Made with almond flour. These are almond flour brownies, but the hint of nutty flavor doesn’t overpower them. I find it actually enhances the flavor, without any of the weird aftertaste you occasionally get from some gluten-free flours.
- Ridiculously easy. This gluten-free brownies recipe is so easy, don’t be surprised when you’re making these all the time. One bowl and a few minutes are all you need to mix the batter.
- Versatile. Use this recipe as the base for the likes of rocky road brownies, Baileys fudge brownies, and gluten-free brookies! You can add nuts or chocolate chips, or top them with frosting. The sky’s the limit. I also tell you how to adjust the baking time to make a square pan of thick brownies or a rectangular pan of thinner ones.

Recipe Ingredients
My gluten-free brownies are intensely chocolatey and chewy thanks to melted chocolate AND cocoa powder in the batter. Here are the simple ingredients you’ll need to make them. Scroll down to the recipe card after the post for the printable recipe with the full amounts and details.
- Unsalted Butter – You can use salted butter instead if you like, but I would omit the extra salt in that case.
- Chocolate Chips – Your favorite brand of semisweet chocolate chips will do. You can also make this recipe with dark chocolate or chopped chocolate bars.
- Eggs – Let these come to room temperature.
- Granulated Sugar – You could also use light brown sugar.
- Cocoa Powder – This can be natural unsweetened cocoa powder or Dutch-processed cocoa powder. The batter with be darker and fudgier with Dutch-processed cocoa.
- Almond Flour – This is different from almond meal as it’s more finely ground. Technically, almond meal does work in this recipe, but almond flour gives the brownies a better texture.
- Salt
- Vanilla Extract – My little secret to enhance the flavor. Make sure the brand you use is gluten-free.

How to Make Gluten-Free Brownies
You can make thinner brownies in a 9×13-inch pan, or big, thick brownies in an 8-inch square pan. I love that no matter how thin or thick you make them, these still turn out chewy and rich! Follow the steps below. You’ll find the printable instructions in the recipe card after the post.
- Prepare. Start by preheating your oven to 350°F and lining your chosen baking pan with parchment paper.
- Melt the butter and chocolate. Meanwhile, melt the butter and chocolate chips in a double boiler (or a glass or metal bowl set over a saucepan of simmering water). Stir until melted, then set aside.
- Beat the eggs and sugar. In another bowl, whisk the eggs and sugar together for about two minutes until they are slightly thickened and pale yellow, and the sugar is nearly dissolved.


- Make the batter. While whisking constantly, slowly pour the melted chocolate mixture into the egg mixture. Then whisk in the cocoa powder, almond flour, salt, and vanilla extract. If you want to add some chocolate chips or walnuts, now’s the time.


- Bake the brownies. Pour the batter into the prepared pan and bake at 350°F. You’ll need about 30-35 minutes for a square pan or 20-25 minutes for a rectangular one. The brownies should be just set in the middle when they come out of the oven.
- Let them cool completely in the pan before cutting them. The easiest way to cut these gluten-free brownies is to lift the brownies out of the pan with the parchment paper and cut them on a cutting board using a serrated knife. Because they are so fudgy, you’ll likely want to wipe the knife blade clean between each cut.


Tips for Success
- Be careful with the temperature. You’ll want to use a double boiler when melting the butter with the chocolate. Make sure the water is just at a simmer so that you don’t scorch the chocolate. Also, let the chocolate mixture cool just a bit. You can do this while you are beating the eggs and sugar. When you add it to the egg mixture, do so slowly while whisking constantly to avoid scrambling the eggs.
- Beat the eggs long enough. While we aren’t trying to achieve cakey brownies here, there is no baking powder, baking soda, or other leavening agent in this recipe. To give the brownies lift, be sure to beat the eggs enough so that they’re slightly thick and pale yellow. This ensures that the sugar is fully dissolved for a glossy, crackly top.
- Line the pan with parchment paper. This step is definitely worth it to keep these uber-fudgy gluten-free brownies from sticking to the pan. It also allows you to pull the brownies right out of the pan and cut them on a cutting board to get perfect squares instead of a mangled mess.
- Slice nice squares. Besides lifting the brownies out of the pan, I also recommend cutting them with a serrated knife or large brisket knife, and wiping the knife clean between each slice.
How to Store
- At room temperature. Store your gluten-free brownies in an airtight container or wrapped tightly with plastic wrap. You can keep them at room temperature for up to 2 days, and about a week in the fridge. They may become drier the longer you keep them, but they will still be chewy and delicious.
- Freeze. Store the brownies in an airtight container and wrap the whole thing in plastic wrap, or place it in a plastic freezer storage bag, and squeeze the air out. You can also individually wrap the brownies in plastic and place them in a sealed container or zip-top bag. For the best quality, enjoy them within 2 months.

Easy Variations
While these gluten-free brownies are guaranteed to cure even your strongest sugar cravings as they are, there are definitely ways to switch them up if you like. Try these ideas:
- Add chocolate chips. Try stirring in a cup of chocolate chips, or even white chocolate chips or peanut butter chips, before baking.
- Toss in some nuts. You can also add toasted walnuts or pecans.
- Make frosted brownies. Use either homemade vanilla frosting or chocolate frosting. Or, for a delicious, tangy flavor, try cream cheese frosting.
- Grab some Oreos. Or round up your favorite gluten-free chocolate sandwich cookies, stir them into the brownies, and make gluten-free Oreo frosting.
- Combine the brownies with cookies. Make the ultimate dessert mash-up that is gluten-free brookies.

Serving Suggestions
Of course, all you need to enjoy rich gluten-free brownies is a glass of milk. But you can turn your brownies into an even more indulgent dessert if you like. By the way… I’ll take one of the corner pieces. A bit of the edge, a bit of the middle, it’s the best of all worlds!
- Serve them a la mode. Add a scoop of your favorite ice cream, like this simple but spectacular no-churn cheesecake ice cream or even no-churn cookies and cream ice cream made with gluten-free Oreos.
- Make a sundae. In addition to the ice cream, you can add hot fudge sauce, whipped cream, and a cherry.
- Add a sauce. A fruit sauce is a great pairing with the chocolate, like a drizzle of raspberry sauce. Or go with a decadent caramel sauce.
- Make ice cream. Stir some broken up brownies into no-churn Nutella brownie ice cream.
- Make parfaits. Use small cubes of brownie as the base for pumpkin cheesecake parfaits.
- Create brownie pops. Crumble those brownies, roll balls, dip them in chocolate, and make brownie pops.

Fudgy Gluten Free Brownies
Ingredients
- 1/2 cup unsalted butter (one 1/4 lb stick)
- 1 cup semisweet chocolate chips
- 4 large eggs
- 1 cup granulated sugar
- 1/2 cup cocoa powder
- 1/2 cup almond flour
- 1/2 teaspoon salt
- 2 teaspoons pure vanilla extract
- optional 1 cup of chocolate chips or walnuts
Instructions
- Preheat your oven to 350°F and line an 8-inch square pan or a 13×9 inch pan with parchment paper.
- In a double boiler or a bowl set over a simmering pan of water, melt 1/2 cup unsalted butter, then add 1 cup semisweet chocolate chips, stirring until melted. Set aside to cool slightly.
- In a large bowl, whisk together 4 large eggs1 cup granulated sugar for about two minutes until it is thickened slightly and pale yellow. Do not rush this step.
- While whisking constantly, slowly add the melted chocolate mixture a little at a time until it has all been incorporated.
- Whisk in 1/2 cup cocoa powder, 1/2 cup almond flour, 1/2 teaspoon salt, and 2 teaspoons pure vanilla extract. Stir in the optional 1 cup of chocolate chips or walnuts, if you are using them.
- Pour the batter into the prepared pan and spread evenly.
- Bake at 350°F until just set in the middle. This will take 30-35 minutes for the 8-inch square pan or 20-25 minutes for the 13×9-inch pan.
- Cool completely in the pan before cutting into squares. The easiest way to do this is to lift the brownies out of the pan with the parchment paper and cut them on a cutting board using a serrated knife that you wipe clean between each cut.
Notes
- Nutrition facts do not include the optional mix-ins.
- To Store: Store your brownies in an airtight container or wrapped tightly with plastic wrap. You can keep them at room temperature for up to 2 days, and about a week in the fridge. They may become drier the longer you keep them, but they will still be chewy and delicious.
- To Freeze: If you want to keep some extra gluten free brownies on hand for any time a chocolate craving strikes, you can freeze them. Place them in an airtight container that you either wrap in plastic wrap or place in a plastic freezer storage bag, and squeeze the air out. You can also individually wrap them in plastic and place them in a sealed container or plastic zip top bag. For the best quality, enjoy them within 2 months.
Did you make this?
Leave a star rating to help others know that they should make this recipe.
Share a photo and tag @cupcakesandkalechips on Instagram!