
Gluten Free Brownie in a Mug


This easy gluten-free brownie in a mug is a fudgy, decadent dessert for two that’s ready in the oven in 25 minutes! These mug brownies have rich, gooey chocolate centers and are delicious served warm with your favorite ice cream. It’s the best way to sweeten up a date night at home.
You’ll love this version of my favorite gluten-free brownies made in a mug! Also, try my gluten-free brookies and rocky road brownies.

Delicious Details
- Cuisine Inspiration: American
- Primary Cooking Method: Oven
- Dietary Info: Gluten-free
- Skill Level: Easy
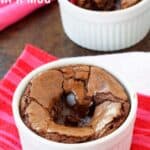
Today’s fudgy gluten-free mug brownie has all the indulgence of a full pan of homemade brownies, without the need to actually bake a full pan. With its gooey, hot fudge center and crackly top, this gluten-free brownie in a mug is so chocolatey and delicious. This dessert for two makes the perfect pair of sweet treats for you and your sweetie (even if that sweetie is also you!). Instead of microwaving, I make my mug brownie in the oven for that unbeatable, freshly baked flavor, perfect served warm with a scoop of ice cream.
Why These Gluten-Free Mug Brownies Have My Heart
- Decadently fudgy. These brownies are perfectly crisp and crackly on top with warm, fudgy, melty chocolate insides. They’re deliciously rich and decadent, yet so simple to make!
- Easy. This brownie recipe calls for simple ingredients and quick, no-fuss baking. Plus, the results are incredible! That’s my kind of easy dessert.
- Perfect serving sizes. This recipe makes just enough for two indulgent mug brownies, meaning you’re not left with a pan full of leftovers afterwards (while extra brownies don’t sound like a bad thing, tell that to my freezer full of Christmas cookies)!

Brownie Ingredients
Here are the ingredients for these ooey-gooey gluten-free mug brownies for two. Check out the recipe card below the post for the printable recipe with exact amounts.
- Semi-Sweet Chocolate Chips – You’ll need chocolate chips for the chocolate brownie batter as well as a couple of extra tablespoons for the melted chocolate filling. Be sure to use semi-sweet chocolate, as milk chocolate won’t offer the same texture when melted.
- Gluten Free Flour – I use a combination of gluten-free alternatives like almond flour (or almond meal) and brown rice flour for this mug brownie recipe.
- Sugar – Regular granulated sugar always yields the most consistent results when baking.
- Vanilla Extract – For the best and most natural vanilla flavor possible, stick with pure vanilla extract!
- Butter – I usually opt for unsalted butter, but salted will work too – feel free to omit the extra salt if you go this route.
- Egg – To add moisture and to bind all of the ingredients together. For easy mixing, bring the egg to room temperature before you start.

How to Make a Brownie in a Mug
This recipe makes just enough for two mug brownies. Here’s how they come together easily in the oven:
- Melt the butter and the chocolate. First, use a double boiler to melt together the butter and chocolate chips. Remove the chocolate from the heat once you have a smooth consistency.
- Combine the rest of the ingredients. Cream together the egg and sugar. Slowly add in the melted chocolate while continuing to whisk, followed by the salt, vanilla, and both flours.


- Divide the batter. Divide the batter between two ramekins. I place my ramekins on a baking sheet for convenience, and also just in case there’s any batter overflow during baking. Once filled with batter, gently press a tablespoon’s worth of chocolate chips into the center of each ramekin.


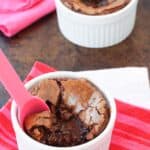
- Bake. Bake the brownies in a preheated oven until they’re not quite set and the tops crackle a little. Give them a minute or so to cool once they’re out of the oven, then serve right from the mug! Toppings like vanilla ice cream come highly recommended. See my suggestions later on for more ideas.

Recipe Tips
See? Super easy. You’ll be done in half an hour! I do have just a few more tips to share with you, though, to make the mug-brownie-making process even easier:
- Be careful not to over-bake the brownies. Over-baked brownies will become dry and chewy around the edges. Keep an eye while they’re in the oven (note that not all ovens are the same!) and take them out once they start to crackle. Keep in mind that they’ll continue to set up as they cool.
- Don’t over-mix the batter. This will lead to brownies that are tough and chewy.
- Make the brownies in cupcake tins if you don’t have ramekins. Standard-sized ramekins can be found in most kitchen supply stores. However, never fear, you can make these brownies without them, too! Use a greased cupcake tin, without paper cupcake cups. You can also use regular ceramic mugs (just make sure they’re oven-safe). As a last resort, pour the batter into a small baking dish, bake, and dig in with two spoons!
- Don’t worry if the brownies sink a little bit in the middle. Since this recipe involves melted warm fudge in the center of the brownies, a little collapsing is normal and expected! The overall texture will still be fudgy and unaffected. If anything, it’s the perfect excuse to fill up the “dip” of your mug brownie with ice cream!
Can I Make This in the Microwave?
Yes. If you’d like to make this gluten-free mug brownie in the microwave instead, I recommend cooking one brownie at a time. Use a large enough mug to avoid any potential overflow. Mix the batter as directed, and divide it evenly between your mugs. Microwave for 1 minute, then in 30-second intervals until the brownie is cooked through but still soft in the middle.

Try These Topping Ideas
I love to keep it classic and top my brownie in a mug with vanilla ice cream or whipped cream when serving. But there are tons of topping ideas to try! Here are some more suggestions:
- Caramel or chocolate sauce (For an adult twist, try my 5-minute Baileys hot fudge sauce!)
- Milk chocolate or white chocolate chips, or peanut butter chips
- Powdered sugar, or even Mexican chocolate spice mix
- Homemade ice cream (Try easy no-churn ice cream recipes like this Nutella toffee ice cream, or vanilla bean cheesecake ice cream!)
- Chopped pecans, almonds, cashews, or hazelnuts
- Crushed pistachios
- Mint chocolate chunks
- Shredded coconut and dried pineapple

How to Store
- To store. Store the baked brownies airtight at room temperature for 3-4 days, or up to 5 days in the fridge. Either cover the ramekins so that they’re airtight, or remove the brownies and store them in a container.
- To reheat. When you’re ready to serve, heat the brownies in the microwave for a few seconds until the chocolate is melted and the brownie is warmed through.
More Brownies Recipes

Gluten-Free Mug Brownie
Ingredients
- 1/4 cup unsalted butter (1/2 stick)
- 2/3 cup semisweet chocolate chips + 2 teaspoons extra
- 1 egg
- 1/4 cup granulated sugar
- 1/8 teaspoon salt
- 1/2 teaspoon vanilla extract
- 2 tablespoons almond flour or almond meal
- 1 tablespoon brown rice flour
- Optional ice cream or whipped cream for serving if desired
Instructions
- Preheat oven to 325°F and place two 6-ounce ramekins on a baking sheet (just in case).
- Melt the butter and 2/3 cup chocolate chips in a medium bowl over simmering water and stir until smooth. Remove the bowl from the pan and let cool.
- Combine the egg and sugar in a medium bowl and whisk until thick and lighter in color.
- While whisking, gradually add the melted chocolate, then whisk in the salt, vanilla, almond meal, and rice flour.
- Divide the batter between the two ramekins and place 1 tsp chocolate chips in the center of each ramekin, pressing down lightly.
- Bake at 325°F for 20-25 minutes or until not quite set, and the tops crackle.
- Let cool slightly before serving, topping with ice cream or whipped cream, if desired.
Notes
- To store. Store the baked brownies airtight at room temperature for 3-4 days, or up to 5 days in the fridge. Either cover the ramekins so that they’re airtight, or remove the brownies and store them in a container.
- To reheat. When you’re ready to serve, heat the brownies in the microwave for a few seconds until the chocolate is melted and the brownie is warmed through.
Did you make this?
Leave a star rating to help others know that they should make this recipe.
Share a photo and tag @cupcakesandkalechips on Instagram!
Can we sub cup 4 cup GF FLOUR? If I was to quadruple this recipe (making for 8), is it just as easy to multiply everything by 4? Thanks!!!
I will be honest, I have never tested either of those things. I think you could use Cup4Cup for the rice flour, but the almond flour keeps it from getting too dry while providing structure. I think multiplying would work fine. If you want a full batch of brownies, my full-size recipe is similar and can be baked in a square or rectangle pan – https://cupcakesandkalechips.com/gluten-free-brownies/