
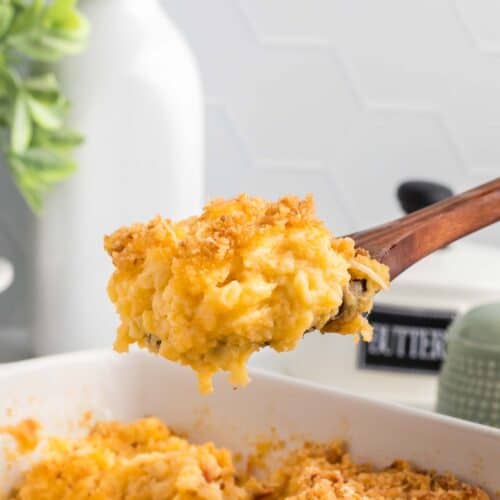
Gluten Free Baked Mac and Cheese

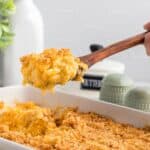


Ready to indulge in the ultimate comfort food? This gluten-free baked mac and cheese is so creamy and satisfying, with a golden-brown breadcrumb topping that makes it extra cozy and crave-worthy! Nobody will ever guess it’s gluten-free.

Delicious Details
- Cuisine Inspiration: American
- Primary Cooking Method: Oven
- Dietary Info: Gluten-free
- Skill Level: Easy
Gluten-free comfort food lovers, rejoice! This mac and cheese recipe is here to prove that going gluten-free doesn’t mean giving up on rich, cheesy, indulgent dishes. Perfectly al dente gluten-free pasta is smothered in a velvety, homemade cheese sauce made with freshly shredded cheddar and mozzarella.
It’s just as good as my Gluten Free Stovetop Mac & Cheese, but I added this buttery, parmesan-loaded breadcrumb topping and popped it in the oven. The bubbly sauce and the golden brown crunch really elevates this childhood classic into a gourmet masterpiece that’s sure to satisfy everyone at the table, whether they follow a gluten-free diet or not. Perfect for a holiday dinner or a cozy night in with the family, this better-than-the-box, easy mac and cheese is the ultimate comfort food.
The GF Baked Mac and Cheese You’ll Crave on Repeat
So why this mac and cheese recipe? I could go on and on, but here are 3 of my absolute favorite things about it:
- Unbeatable flavor. Made with REAL cheddar and mozzarella cheese (so many mac and cheeses you’ll find use stuff like velveeta and powdered cheese), this from-scratch rendition delivers a rich, deeply savory flavor profile, thoughtfully seasoned with garlic, onion, salt, and pepper. It’s an elevated version of that simple childhood favorite you love!
- Addictive texture. Between the perfectly al dente pasta enveloped in lusciously creamy, gooey cheese sauce and the subtly crunchy, golden-brown, buttery breadcrumb topping, this mac and cheese is pretty much impossible to resist.
- WAY better than the box. I already touched on this a bit, but I just have to emphasize the fact that this homemade mac and cheese knocks the boxed stuff out of the park! From the homemade roux to the rich cream to the REAL freshly grated cheese and crispy breadcrumb topping, it’s a gourmet experience you can’t find in a packet.

What You’ll Need
Below is a list of the ingredients you’ll need to gather to make this recipe, why you need them, and possible substitutions. Scroll all the way down for the full recipe card with measurements.
For the pasta and cheese sauce:
- Gluten-free elbow macaroni – Cooked to al dente according to the package directions, then drained. I like to save a little pasta water just in case my cheese sauce gets too sticky. My brand preference is Barilla.
- Unsalted butter – You can use salted butter. Just be a little careful with adding any additional salt moving forward.
- Gluten-free all-purpose flour – I like King Arthur’s Measure for Measure Flour, but most 1:1 gluten-free flours will work.
- Milk – Or half and half if you prefer a richer mac and cheese.
- Heavy cream – If you prefer a lighter cheese sauce, you can use half and half.
- Seasoning – Garlic powder, onion powder, salt, and ground black pepper.
- Cheeses – Cheddar and mozzarella. Freshly shredded for the best flavor and melt. Pre-shredded cheese is often loaded with funky additives and doesn’t melt well.
For the topping:
- Gluten-free breadcrumbs – Store-bought or homemade. You can substitute breadcrumbs with crushed gluten-free crackers (try gluten free cheddar crackers for extra cheesiness) or chips for a different texture and flavor. Keep in mind that this will change the overall taste of the dish.
- Melted butter – Use unsalted butter, as breadcrumbs are often seasoned, and the Parmesan cheese adds some saltiness.
- Grated parmesan cheese – Freshly grated, please! For the best flavor.

How to Make Gluten Free Mac and Cheese
Here’s a basic overview of how to make gluten free mac and cheese. Scroll on down to the recipe card below for a closer look.
- Prep. Preheat the oven to 375℉ and grease a 9×13-inch baking dish.
- Cook the pasta. Cook the pasta according to package directions (to al dente). Drain.
- Make a roux. In a large pot, melt the butter over medium-low heat, then whisk in the flour. Whisk until you achieve a thick roux.
- Build the white sauce. Slowly whisk the milk and heavy cream into the roux. Whisk until smooth and then stir in the seasonings.


- Thicken. Keep whisking until the sauce comes to a gentle boil. Then, reduce the heat to low and stir continuously until the mixture thickens ( about 5 minutes).
- Make it cheesy. Remove the pot from the heat and stir in the cheeses until melted.


- Put it all together. Toss the noodles with the sauce and spread them into the baking dish.
- Make the topping. Whisk together the breadcrumbs, parmesan cheese, and melted butter.
- Assemble and bake. Spread the breadcrumb mixture over the mac and cheese and bake for 12-18 minutes. For a golden-brown topping, broil for 2-3 minutes at the end.
- Cool and serve. Remove the dish from the oven and let it cool slightly before serving.


Tips for Success
Have a quick read through these simple tips and tricks. They’ll help you avoid some common pitfalls and achieve the mac and cheese of your dreams.
- Salt your pasta water. Unless you want bland noodles, throw a generous pinch or two of salt into your pasta water as it comes to a boil.
- Avoid soggy noodles. Cook the noodles until al dente or just slightly undercooked. I like to rinse mine under cold water after draining them to prevent further cooking. They will continue to soften in the cheese sauce, so undercooking them helps them hold their shape.
- Save some pasta water. When draining the pasta, reserve 1-2 cups of the water. If the sauce ends up being too thick or has a hard time adhering to the pasta, you can add a splash or two to help loosen things up.
- Keep an eye on the heat (and keep things moving). When melting the butter, cooking the roux, and throughout the process of building the sauce, keep the heat to medium-low and keep things moving! This will help keep everything from burning, the dairy from curdling, and the sauce from sticking to the pot.
- Shred your own cheese. Pre-shredded cheese often contains additives that give it a funky texture and make it less meltable. For a gooier, more delicious sauce, shred your cheeses fresh from the block.
- Stir gently. When incorporating the noodles into the cheese sauce, stir gently (ideally with a rubber spatula) to avoid tearing the pasta.
- Keep an eye on things. If you choose to broil the mac and cheese, watch closely, checking on it every 40-60 seconds, to avoid burning.

Variation Ideas
This recipe is wonderfully customizable. Here come a few fun ways to play with it and make it your own:
- Have fun with different cheeses. Whether you’re swapping some (or all) of the cheese out for different kinds, experimenting with cheeses is a fun way to customize this dish. Try adding a cup of freshly grated Parmesan to the mix or swap the cheddar or mozzarella out for Gouda or pepper jack!
- Add some protein. Pulled pork? Shredded chicken? Crispy bacon? How about lobster or crab!? Regardless, folding some extra protein into these cheesy noodles before baking them is a great way to elevate the dish.
- Experiment with seasonings. I will sometimes add a little smoked paprika, red pepper flakes, or chili powder to the cheese sauce if I’m in the mood for something spicy. Cajun seasoning or Old Bay would also be a fun swap for the Italian seasoning.
- Buffalo twist. For a bold buffalo twist, mix some shredded chicken and blue cheese into the cheesy pasta and then drizzle buffalo sauce on top (before adding the breadcrumbs and baking)!
- Make it dairy-free. Staying away from dairy? Feel free to use dairy-free milk, such as cashew or coconut milk (full-fat, unflavored, and unsweetened), and replace the cheese with your favorite dairy-free alternatives.

Can I Make This Mac and Cheese Ahead of Time?
Absolutely! You can cook the pasta up to 2 days ahead of time. Toss the al dente pasta with a tablespoon or two of melted butter (to keep it from drying out). Once cool, seal it in an airtight container and store it in the fridge.
When you’re ready to bake, make the cheese sauce and toss it with the noodles. From there, you can spread the mixture into a greased baking dish, add your breadcrumb topping, and bake. Otherwise, leave the topping off, wrap the baking dish with a double layer of plastic wrap, and store it in the fridge for up to 2 days (or in the freezer for up to 3 months). When you’re ready to enjoy, add the breadcrumb topping and bake!
How to Store and Reheat Extras
- Refrigerator. Once cool, cover the baking dish in a double layer of plastic wrap or seal the leftovers in an airtight container. You can store them in the fridge for up to 4 days.
- Freezer. Allow the mac and cheese to cool before transferring it to a freezer-safe airtight container. It’ll keep in the freezer for up to 3 months. Allow it to thaw in the fridge before reheating.
- To reheat. Reheat this addictively cheesy dish in the oven at 350℉ for ~15 minutes. I usually cover mine with foil to prevent burning. You can also microwave individual portions in 30-second intervals until warm.

Make It a Meal
Wondering what to serve with this fabulous gluten free baked mac and cheese? I’ve got some ideas for you!
- Meaty mains. Pair your creamy mac and cheese with a hearty protein like BBQ Pulled Pork, Instant Pot BBQ Pulled Chicken, BBQ Grilled Chicken Breasts, Air Fryer Hot Dogs, or French Onion Burgers. You can even mix pulled pork or pulled chicken INTO the mac ‘n cheese before you transfer it to the baking dish.
- Green salads. Add a refreshing aspect to your plate with a crisp Chicken Caesar Salad. Otherwise, toss some greens with my creamy Avocado Ranch Dressing (or a dressing of your choice) and some fresh veggies.
- Cooked veggies. Complement the cheesy goodness with flavorful veggie sides like Air Fryer Roasted Carrots, Perfect Oven-Roasted Asparagus, or Sautéed Green Beans with Bacon. This Parmesan Roasted Broccoli would also be amazing.
- Classic cookout sides. Mac and cheese might just be the ultimate comfort food side dish, but it’s even better when it teams up with other classics like Easy Baked Beans, Easy Coleslaw, or a creamy Bacon Ranch Potato Salad.
- Holiday feast. Don’t forget your baked mac and cheese to serve with your Thanksgiving Roast Turkey, a lovely Beef Roast on Christmas, or that holiday Pineapple Glazed Ham.
- Desserts. No meal is complete without a sweet treat. End on a high note with Gluten-Free Chocolate Chip Cookies or indulgent Cheesecake Brownies.
More GF Pasta Dinner Ideas
In a pasta kind of mood? I’ve got plenty of recipes to keep you satisfied. And they’re all gluten-free!
Gluten Free Baked Macaroni and Cheese
Ingredients
- 12 ounce box of gluten-free elbow macaroni cooked al dente according to the package directions and drained
- ¼ cup unsalted butter
- ¼ cup gluten-free All Purpose Flour (I used King Arthur Measure for Measure)
- 1 ½ cups milk
- 1 ½ cups heavy cream
- ½ teaspoon garlic powder
- ½ teaspoon onion powder
- 1 teaspoon salt adjust taste as needed
- ½ teaspoon ground black pepper
- 3 cups freshly shredded cheddar cheese
- 1 cup freshly shredded mozzarella
For the topping:
- 1 cup gluten-free breadcrumbs You can substitute breadcrumbs with crushed gluten-free crackers or chips for a different texture and flavor. Keep in mind this will change the overall taste of the dish.
- 2 tablespoons melted butter
- ¼ cup grated parmesan cheese
Instructions
- Preheat the oven to 375℉. Coat a 9×13 baking dish with nonstick cooking spray.
- Cook a 12 ounce box of gluten-free elbow macaroni according to package directions to al dente and drain thoroughly. Set aside.
- While the oven preheats and the pasta is cooking, in a large pot, melt ¼ cup unsalted butter over medium-low heat. After the butter completely melts, whisk in ¼ cup gluten-free All Purpose Flour. Continue to whisk until the butter and flour create a thick roux.
- While whisking constantly, slowly pour in 1 ½ cups milk and 1 ½ cups heavy cream. Whisk until smooth. Then, add ½ teaspoon garlic powder, ½ teaspoon onion powder, 1 teaspoon salt, and ½ teaspoon ground black pepper. Continue whisking until the seasonings are fully incorporated. Slowly whisk until the mixture just begins to gently boil.
- Reduce the heat to low and stir continuously until the mixture thickens, about 5 minutes. Be sure to stir continuously to prevent sticking or burning.
- Once thickened, remove the pot from heat and add 3 cups freshly shredded cheddar cheese and 1 cup freshly shredded mozzarella. Mix until all the cheese has melted and is fully incorporated into the mixture.
- Add the cooked noodles to the cheese mixture and stir until every noodle is coated.
- Transfer the noodles to the prepared baking dish, spreading them into an even layer.
- In a medium bowl, combine 1 cup gluten-free breadcrumbs, ¼ cup grated parmesan cheese, and 2 tablespoons melted butter. Mix until evenly coated.
- Spread the breadcrumb mixture evenly over the mac and cheese. Make sure the topping is an even thickness.
- Bake at 375℉ for 12-18 minutes, or until the cheese around the edges begins to bubble. For a golden-brown topping, broil or increase the oven to 500℉ for 2-3 minutes. Watch closely to avoid burning, checking every 40-60 seconds.
- Remove from the oven and let cool slightly before serving.

Did you make this?
Leave a star rating to help others know that they should make this recipe.
Share a photo and tag @cupcakesandkalechips on Instagram!