
Gluten Free Breadcrumbs


Tired of disappointing gluten-free breadcrumbs? This homemade version delivers the perfect crunch and flavor to upgrade all your favorite dishes. From fish sticks and chicken nuggets to meatloaf and casseroles, they’re a staple every household needs (gluten-free or not).

Delicious Details
- Cuisine Inspiration: American
- Primary Cooking Method: Oven
- Dietary Info: Gluten-free, Dairy-free option
- Skill Level: Easy
If you’ve been on a gluten-free diet for a while (or if you have gluten-free members of your household), you know what a struggle it is to find good breadcrumbs. Too often, store-bought options are a letdown—either they’re totally tasteless, or they have a funky, unappealing texture that turns gummy and is just no good. Not these.
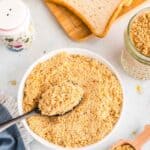
Say goodbye to disappointing carboard-adjacent breadcrumbs and hello to the crispy, flavorful recipe addition of your dreams. These homemade gluten-free breadcrumbs aren’t just a substitute for the real thing; they’re an upgrade. They deliver the perfect crunch and subtle flavor that will elevate any dish, from Crispy Chicken Nuggets to bubbling casseroles. Best of all, they’re incredibly simple to whip up with just a few pantry staples and about 30 minutes of your time. Prepare to be amazed!
Why You’ll Love Crunchy and Toasty Gluten Free Breadcrumbs
Wondering why you should go the extra mile and make your own gluten-free breadcrumbs? Here’s your sign:
- The crunch you’ll want on everything. These breadcrumbs are perfectly crunchy, giving your dishes the satisfying texture and golden-brown finish they’ve been missing.
- Way better than store-bought. Let’s be honest, many gluten-free store-bought breadcrumbs just don’t cut it. They’re often bland or have a strange (or non-existent) texture, sometimes turning your meatloaf to mush. Making them at home breaks the mold. These have the BEST crunch and flavor. You won’t even miss the gluten.
- Super easy to make. All you need is gluten-free bread, a bit of oil, and some salt (and Italian seasoning if you want to get fancy). You probably already have all that in your pantry, right? Then, in just over 30 minutes, you’ll have delicious breadcrumbs.

What You’ll Need
Below is a list of the ingredients you’ll need to gather to make this recipe, why you need them, and possible substitutions. Scroll all the way down for the full recipe card with measurements.
- Gluten-free bread – Cut into cubes. I used white sandwich bread, but pick your favorite. Sourdough is always yum.
- Olive oil – Avocado oil will also do the trick. So will melted butter if you’re feeling decadent.
- Salt – Just a smidge to keep things interesting.
- Italian seasoning (optional) – If you’d like, you can season your breadcrumbs with a store-bought Italian seasoning blend or make your own blend with parsley, oregano, basil, thyme, rosemary, garlic powder, and onion powder.

How to Make GF Breadcrumbs From Scratch
Here’s a basic overview of how to make these crunchy breadcrumbs. Be sure to scroll to the recipe card below for more detailed instructions.
- Dry the bread. Preheat the oven to 300°F. Spread the bread over a baking sheet and bake for 25–30 minutes. After 10 minutes, shake the baking sheet and flip the cubes every few minutes until dry.


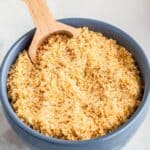
- Blend. In a food processor, blend the bread cubes until you’re satisfied with the size.


- Season. Toss the bread crumbs with salt and olive oil (and Italian seasoning if using).


Tips and Variation Ideas
Have a quick read through the following tips and tricks before you get started. I threw in some fun variations at the end, too:
- Adjust drying time. Depending on the size of the bread cubes, they’ll need more or less time in the oven. Smaller cubes will dry out more quickly, while larger cubes will take longer.
- Try completely. Make sure the breadcrumbs are completely dry. If they aren’t, they’ll likely clump up in the food processor and/or develop mold over time. You’ll know they’re dry when you squeeze a cube and it feels solid (no softness, sponginess, or moisture).
- Don’t overload the food processor. When blending the bread cubes, don’t overload the food processor, as this will lead to uneven breadcrumbs. Work in batches if you need to.
- Do it without a food processor. No food processor? No problem. You can pulse the bread cubes in a blender or place them in a sturdy ziplock and crush them with a rolling pin or mallet.
- Bread options. You can use any gluten-free bread for this recipe (e.g., sourdough, sandwich, rustic, etc.). Each type will give a different texture. I used white sandwich bread, but feel free to try my homemade gluten-free bread or focaccia. Leftover gluten-free bagels would even work.
- Customize the flavor. Whether you want to skip the Italian seasoning and create your own flavor profile or add to it with some parmesan and/or lemon juice or zest (great for seafood), you’re the boss. A little smoked paprika or chili powder would be fabulous. So would Cajun seasoning or Old Bay.

Ways to Use Them
You really are going to want to incorporate these breadcrumbs into as many recipes as possible. Here are some of my favorite ways to use them:
- As a crispy coating: Use breadcrumbs to coat chicken, fish, or tofu before baking or frying for a crunchy, golden crust. Think Air Fryer Chicken Nuggets, Baked Chicken Tenders, or Air Fryer Chicken Tenders. Tired of chicken? Try my Gluten-Free Fish Sticks, or these Gluten-Free Korean Corn Dogs. And these Air Fryer Onion Rings!? They’re the side dish you’ve been searching for.
- Topping for pasta casseroles. Sprinkle breadcrumbs over baked pasta dishes to add a toasty, flavorful crunch on top. I love using them in my Baked Eggplant Pasta Casserole, on Chicken Tetrazzini, and over this Tuna Noodle Casserole.
- Holiday sides. Your holiday side dish casseroles will also be complete with this crunchy topping. From Gluten Free Baked Mac and Cheese to Gluten Free Green Bean Casserole, if the GF version of those crunchy onions are hard to find.
- As a binding agent. Breadcrumbs are often used in recipes like meatballs, veggie patties, and meatloaf to help bind ingredients together and add texture. Try them in this Classic Meatloaf or in my French Onion Meatballs.
- Soup and salad garnish. Add a handful of toasted breadcrumbs to creamy soups or salads for extra texture and flavor. They would be fab on this Cream of Potato Soup, or my Creamy Chicken Wild Rice Soup. Or on this Italian Romaine Wedge Salad.
How to Store Homemade Breadcrumbs
- Pantry. Once fully cooled, store the breadcrumbs in an airtight container (like a mason jar or ziplock bag) in the pantry for up to 5 days.
- Refrigerator. For longer storage, pop ’em in the fridge in an airtight container (such as a mason jar) for up to 2 weeks.
- Freezer. You can also seal these breadcrumbs in a freezer bag or a mason jar and store them in the freezer for up to 3 months.

More DIY Staples
Maybe I’m weird, but I think it’s SO satisfying to take a store-bought favorite and try to make your own version. Here are a few other DIY recipes I’m proud of:

Gluten Free Breadcrumbs
Equipment
- Food processor optional
Ingredients
- 4-5 cups gluten-free bread cut into cubes (I used white sandwich bread)
- 1 tablespoon olive oil
- 1 teaspoon salt
For Italian seasoned breadcrumbs (optional, see note):
- 1 teaspoon parsley
- 1 teaspoon oregano
- 1 teaspoon basil
- ½ teaspoon thyme
- ½ teaspoon rosemary
- ½ teaspoon marjoram
- ½ teaspoon garlic powder
- ½ teaspoon onion powder
Instructions
- Preheat the oven to 300°F. While the oven is preheating, lay 4-5 cups gluten-free bread (cut into cubes) in a single layer on a large baking sheet.
- Place the baking sheet in the oven on the middle or top rack and bake for about 25-30 minutes. This will depend on the size of your bread cubes. The smaller the cubes, the less amount of time. The larger the cubes, the more amount of time. After the first 10 minutes, be sure to give the baking sheet a shake and flip the bread pieces over with a spatula about every 5-8 minutes to make sure every piece of bread is getting thoroughly and equally dried out.
- Once every piece of bread cubes is dried, remove the bread cubes from the oven. You will know the bread is ready when you gently squeeze one of the bread cubes with your fingers, there should be no squish. The bread should be solid which means it has been dried all the way through. Add the dried bread cubes to a food processor and process them until they are your desired breadcrumb size. You may have to work in batches depending on the size of your processor.
- Add the bread crumbs to a large mixing bowl. Add 1 teaspoon salt to the breadcrumbs and combine thoroughly. Next, add 1 tablespoon olive oil and stir until everything has been completely mixed and blended.
- If using the Italian seasoning, mix together the 1 teaspoon parsley, 1 teaspoon oregano, 1 teaspoon basil, ½ teaspoon thyme, ½ teaspoon rosemary, ½ teaspoon marjoram, ½ teaspoon garlic powder, and ½ teaspoon onion powder. Add the seasoning to the breadcrumbs, and mix thoroughly.
- Store the breadcrumbs in a sealable jar or bag for up to 2 weeks in the pantry.
Notes
Did you make this?
Leave a star rating to help others know that they should make this recipe.
Share a photo and tag @cupcakesandkalechips on Instagram!