
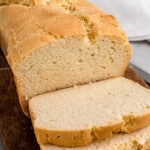
Gluten Free Bread

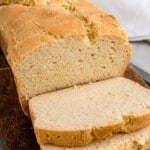


Let’s make delicious gluten-free bread that’s soft, bendy, and sliceable! This homemade sandwich bread recipe is as simple as it gets, with zero kneading and a short, 20-minute rising time. I make it all the time as an alternative to store-bought and use it for toasting, sandwiches, spreading, and more.
This gluten-free bread has stamps of approval for everything from French toast to avocado toast and homemade grilled cheese! You’ll never need another bread recipe.

Delicious Details
- Cuisine Inspiration: American
- Primary Cooking Method: Baking
- Dietary Info: Gluten-free, Dairy-free, Nut-free
- Skill Level: Intermediate
Here’s Why You’ll Love This Gluten-Free Bread
I’ve always loved getting my hands a little dirty to make my own bread. From gluten-free brioche to gluten-free Italian breadsticks, it’s such a fun and rewarding baking project! And it doesn’t need to be a time-consuming or difficult one, either. This homemade gluten-free sandwich bread gets a beautiful golden crust with a bit of crunch on the outside, while the inside stays fluffy and moist. Here’s why it’s going to be your go-to bread recipe:
- Easy ingredients. This recipe uses a handful of ingredients to create a perfect gluten-free loaf of bread, without any fancy flours or additives. If you’re already baking gluten-free, you’ll likely have what you need in the pantry already! If not, the ingredients are easy to pick up at just about any grocery store.
- Perfect texture. I’ll show you how to achieve a soft, sliceable loaf that’s ready for toasting or to use in your favorite sandwich recipes.
- Customizable. This classic gluten-free bread is dairy-free and nut-free, making it the ultimate “base” recipe for more add-ins. Stir in nuts, seeds, or herbs depending on what you prefer. It’s easy to make it your own!
Excellent recipe!! I’ve been searching for a good gluten free bread recipe for the past couple of years. This recipe turned out perfect I’ve made it 3 times since. Thank you so much! ❤ – Sue

Ingredients You’ll Need
Here’s an overview of what you need to make this gluten-free white bread, plus some recommendations if you need to swap out any ingredients. Be sure to scroll to the recipe card for the full amounts and detailed instructions.
- Honey: The sugars feed the yeast and lend a little sweetness to the loaf. You can use an equal amount of maple syrup or agave nectar if needed.
- Active Dry Yeast: If your yeast is old or past its expiration date, you’ll want to stock your pantry with fresh yeast for this recipe. Otherwise, the bread won’t rise correctly.
- Gluten-free All-purpose Flour: Use your favorite all-purpose blend. I like the Pillsbury brand Mutli-Purpose blend. Some 1:1 flours don’t work as well in yeasted bread, such as Bob’s Red Mill 1-to-1 (try their all-purpose flour instead) or Cup4Cup. Feel free to experiment with other gluten-free flour blends to find your favorite flavor and texture. Just make sure to adjust the xanthan gum if your blend doesn’t include it.
- Xanthan Gum: In addition to what is in your flour blend. Xanthan gum imitates gluten in gluten-free bread recipes, lending structure to the dough.
- Baking Powder and Salt: Like the yeast, check the expiration date on your baking powder package to make sure it’s fresh.
- Apple Cider Vinegar: Adding a little vinegar to the dough acts as a natural preservative, extending the shelf life of gluten-free bread. You could also use another type of vinegar, like white vinegar.
- Oil: Use a mild-flavored oil like avocado, canola, or refined coconut oil. You can use melted butter for a richer flavor.
- Eggs: A few readers have asked about substituting the eggs in this recipe! If you’re egg-intolerant, use a vegan egg substitute, such as chia or flax eggs.

How to Make Gluten-Free Sandwich Bread
Here are the steps to make and bake your own gluten-free bread dough. You’ll find the full printable instructions in the recipe card after the post.
- Activate the yeast. You’ll start by warming some water in a microwave-safe bowl. It should be lukewarm (between 105ºF and 115ºF) and not hot, otherwise it’ll kill the yeast. Next, dissolve the honey in the warm water and let it sit for 10 minutes. It should be bubbly and cloudy when it’s ready.
- Combine the dry and wet ingredients separately. In a mixing bowl, combine the flour, xanthan gum, baking powder, and salt. Meanwhile, in a stand mixer, beat the apple cider vinegar with oil and eggs until smooth.
- Mix the dough. Now, add the yeast mixture to the wet ingredients. Then, add the dry ingredients and beat until you have a sticky dough.


- Prepare for baking. While the oven preheats to 375°F, grease a 9×5-inch loaf pan with nonstick spray.
- Proof the dough. Pour the bread dough into the prepared loaf pan. Afterward, place it in a warm place (like on top of the preheating oven) to rise for 20 to 25 minutes.
- Bake. Bake your gluten-free bread for 35 to 40 minutes, until it’s cooked through in the center and golden on top. Remove the loaf from the oven and let it rest for 2 minutes before removing it from the pan to a wire rack to cool. Once it’s cooled to room temperature, slice and enjoy!


Why Didn’t My Bread Rise Properly?
If your gluten-free bread hasn’t risen as expected, there are a few reasons why this might happen. First, check that the yeast you’re using is fresh and that it’s been activated in water that’s warm, but not too hot, as extreme temperatures can deactivate yeast. Next, ensure the baking powder is not expired. Lastly, make sure to proof the dough in a warm place free from drafts. See below for more tips and troubleshooting.

Tips and Variations
- Make sure the yeast has enough time to activate. Otherwise, your loaf may fall flat. If the yeast mixture isn’t foaming after 10-15 minutes, however, it may no longer be active, and using it could result in bread that doesn’t rise. In this case, you’ll need to start over with a fresh packet of yeast.
- Grease the pan well. This helps the bread rise before and during baking. It also makes it easier to remove once it has finished baking and cooling. Add a thin layer of flour for extra non-stick protection.
- Check on the bread periodically. If you notice that the bread is browning too quickly in the oven, loosely cover the top with a piece of aluminum foil for the remaining baking time.
- Let the bread cool fully to room temperature before you slice it. The bread is still continuing to bake for up to an hour after it comes out of the oven, so it’s worth the wait! Also, it’s important to let the bread cool completely before storing it, to prevent condensation which can lead to sogginess.
- Easy add-ins. Personalize your loaf by adding seeds like sunflower or pumpkin for a nutty crunch, or fold in some dried herbs and garlic powder for an aromatic herb bread.
- Add a topping. Before baking, consider brushing the top with a beaten egg or milk for a golden crust. While the egg wash is still wet, sprinkle the top with oats, seeds, or your favorite gluten-free grains for an artisanal touch.

Homemade Bread Troubleshooting and FAQs
A gummy interior could be due to under-baking. Verify that the bread has reached an internal temperature of 205°F (96°C) before removing it from the oven. Make sure to measure the ingredients accurately for the right moisture balance and always cool the bread completely before slicing.
Collapsing can occur if the dough is over-proofed. Let the bread rise only until it’s just about the top of the pan. Make sure your oven is properly preheated and try to open the oven door sparingly to avoid temperature drops that could cause the bread to fall.
If the crust is too hard, it might be due to the oven temperature being too high. Use an oven thermometer to ensure accuracy and tent the bread with foil if necessary. Also, consider the type of glaze or topping you use and apply it gently.
Density in gluten-free bread can result from not enough leavening or not incorporating enough air into the dough. The flour blend’s density and the measurement method are also crucial—spoon the flour into the measuring cup and level it off instead of scooping, which can compact the flour.
A strong yeast flavor can result from using too much yeast or not baking the bread long enough. Measure the yeast carefully and ensure the bread is fully baked to avoid a yeasty aftertaste.

How to Store
- Counter Storage – Store the completely cooled bread in a bread box or wrap it in a clean, dry cloth and place it inside a plastic bag. Seal it to keep air out, and it should last for up to 3-4 days at room temperature.
- Refrigerate – If you prefer to keep your bread in the fridge, wrap the bread in foil or a freezer bag, and it can last for up to a week. However, I find that refrigeration makes the texture slightly more dense and chewy.
- Freeze – Slice the bread and freeze it in airtight bags or containers. Individual slices can be taken out and toasted or thawed as needed and will last for up to 3 months. Remember to separate slices with parchment paper to avoid sticking if you plan to use them one at a time.
- Revitalize Stale Bread – If your bread has dried out or become stale, an easy fix is to briefly heat it in the microwave covered with a damp paper towel. Or, re-crisp it in the oven or toaster to bring back some of the bread’s original texture.

Make It a Meal
- Sandwiches. Spread this bread with peanut butter and jelly for a classic combination, or use it to make a gluten-free BBQ chicken sandwich, BLT, or any of your favorites.
- Make grilled cheese. Keep it basic, add some crispy bacon or a slice of tomato, or try a Kentucky hot brown grilled cheese sandwich.
- Toast it. Enjoy it simply with butter and jam, or make gluten-free Texas toast to serve with barbecue or pasta.
- Meal prep breakfast. Make gluten-free breakfast sandwiches to stash in the freezer, or tear the bread into chunks for a ham and cheese strata.
- Use up leftovers. Let this be the year you make classic gluten-free stuffing with leftover homemade bread! Or, chop up stale bread to make individual French toast casseroles.
More Gluten-Free Bread Recipes

Gluten-Free Bread
Equipment
- stand mixer with paddle attachment
Ingredients
Yeast Mix:
- 1½ cups water
- 3 Tablespoons honey
- 2½ teaspoons active dry yeast
Dry Mix:
- 3 cups gluten-free all-purpose flour blend (I used Pillsbury Multi-Purpose)
- 1 teaspoon xanthan gum (in addition to what is in some blends)
- 4 teaspoons baking powder
- 1 teaspoon salt
Wet Mix:
- 2 teaspoons apple cider vinegar
- ¼ cup oil
- 2 eggs
Instructions
- In a medium bowl, warm water until just warm. It should not be hot to the touch. Stir in honey until dissolved. Gently stir in yeast and set aside to proof for 10 minutes.
- In a separate bowl, add the gluten free flour, xanthan gum, baking powder, and salt, and stir to combine. Set aside.
- In a stand mixer or large mixing bowl, combine the apple cider vinegar, oil, and eggs. Add the paddle attachment and mix for 1 minute.
- Add in the proofed yeast and mix for 10 seconds. Add the dry ingredients and beat on high for 3 minutes. The dough should be a sticky texture.
- Preheat the oven to 375°F and prepare a loaf pan with cooking spray and gluten free flour.
- Gently pour the dough into the prepared loaf pan and smooth out the top with a spatula.
- Place the bread loaf lightly covered on the top of the stove or in another warm area for 20-25 minutes while the oven preheats. The warmth from the oven will help your loaf proof. It's important to not let your dough over-proof. It will continue to rise in the oven.
- Bake in the preheated oven for 35-40 minutes. If the top browns too quickly, you may tent with a piece of foil.
- Once removed from the oven, let the loaf rest for 2 minutes and remove from the pan promptly. Place on a cooling rack to completely cool before slicing.
Did you make this?
Leave a star rating to help others know that they should make this recipe.
Share a photo and tag @cupcakesandkalechips on Instagram!
I think your recipes look very nice! One small concern… on other American recipe sites you can convert the recipes to European measurements, could that be something to consider?
I’m working my way through my recipes and starting to add weights, I just haven’t gotten to all of them yet! Once my broken wrist heals, I’ll be able to get back to working on more of them, and this is top of my list.
Very easy recipe. Came together fast and it tastes good.
Thanks for the feedback!
Very good bread! Even my husband likes it and he doesn’t have to eat gluten free! Am passing on the recipe to friends.
Thank you!
Excellent recipe!! I’ve been searching for a good gluten free bread recipe for the past couple of years. This recipe turned out perfect I’ve made it 3 times since. Thank you so much for this great recipe. Hoping to someday able to replace our store bought gluten free bread with this recipe. I also tried your gluten free Italian breadsticks, another great recipe. So glad I stumbled upon your recipes and website. I will now be searching the entire website for recipes. Again thanks so much❤
I made this bread today and it turned out FANTASTIC. I have been trying to find a good GF Bread recipe for the last couple years due to my husbands allergy. Some have turned out just ok. But this recipe was like “real” bread. Great recipe and easy to follow directions. Thank so so much. I also made your GF Italian breadstick recipe this past weekend, another excellent recipe.
Can’t thank you enough for these recipes. I am making two more loaves tomorrow. Hoping to be able replace our store bought GF bread❤. And now I will be searchingbthrough everything on your website.