
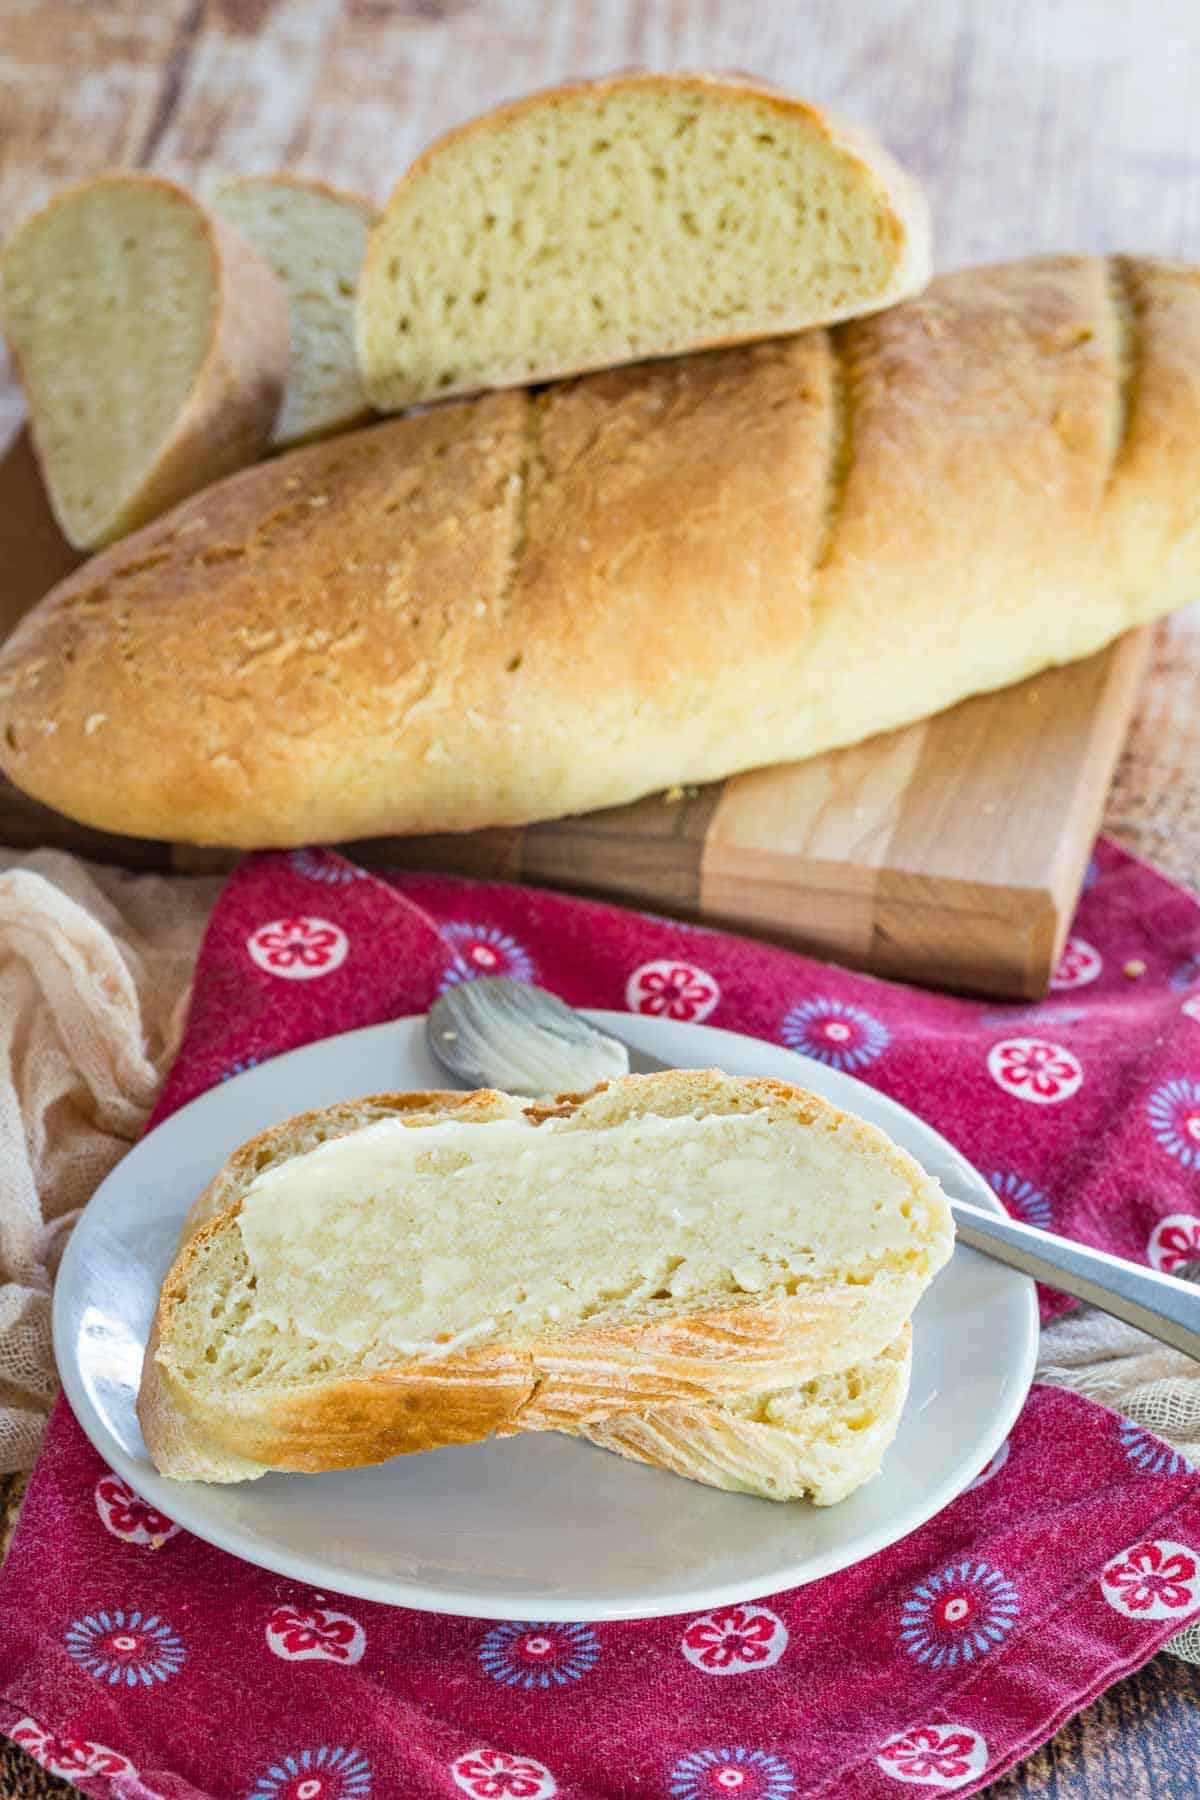
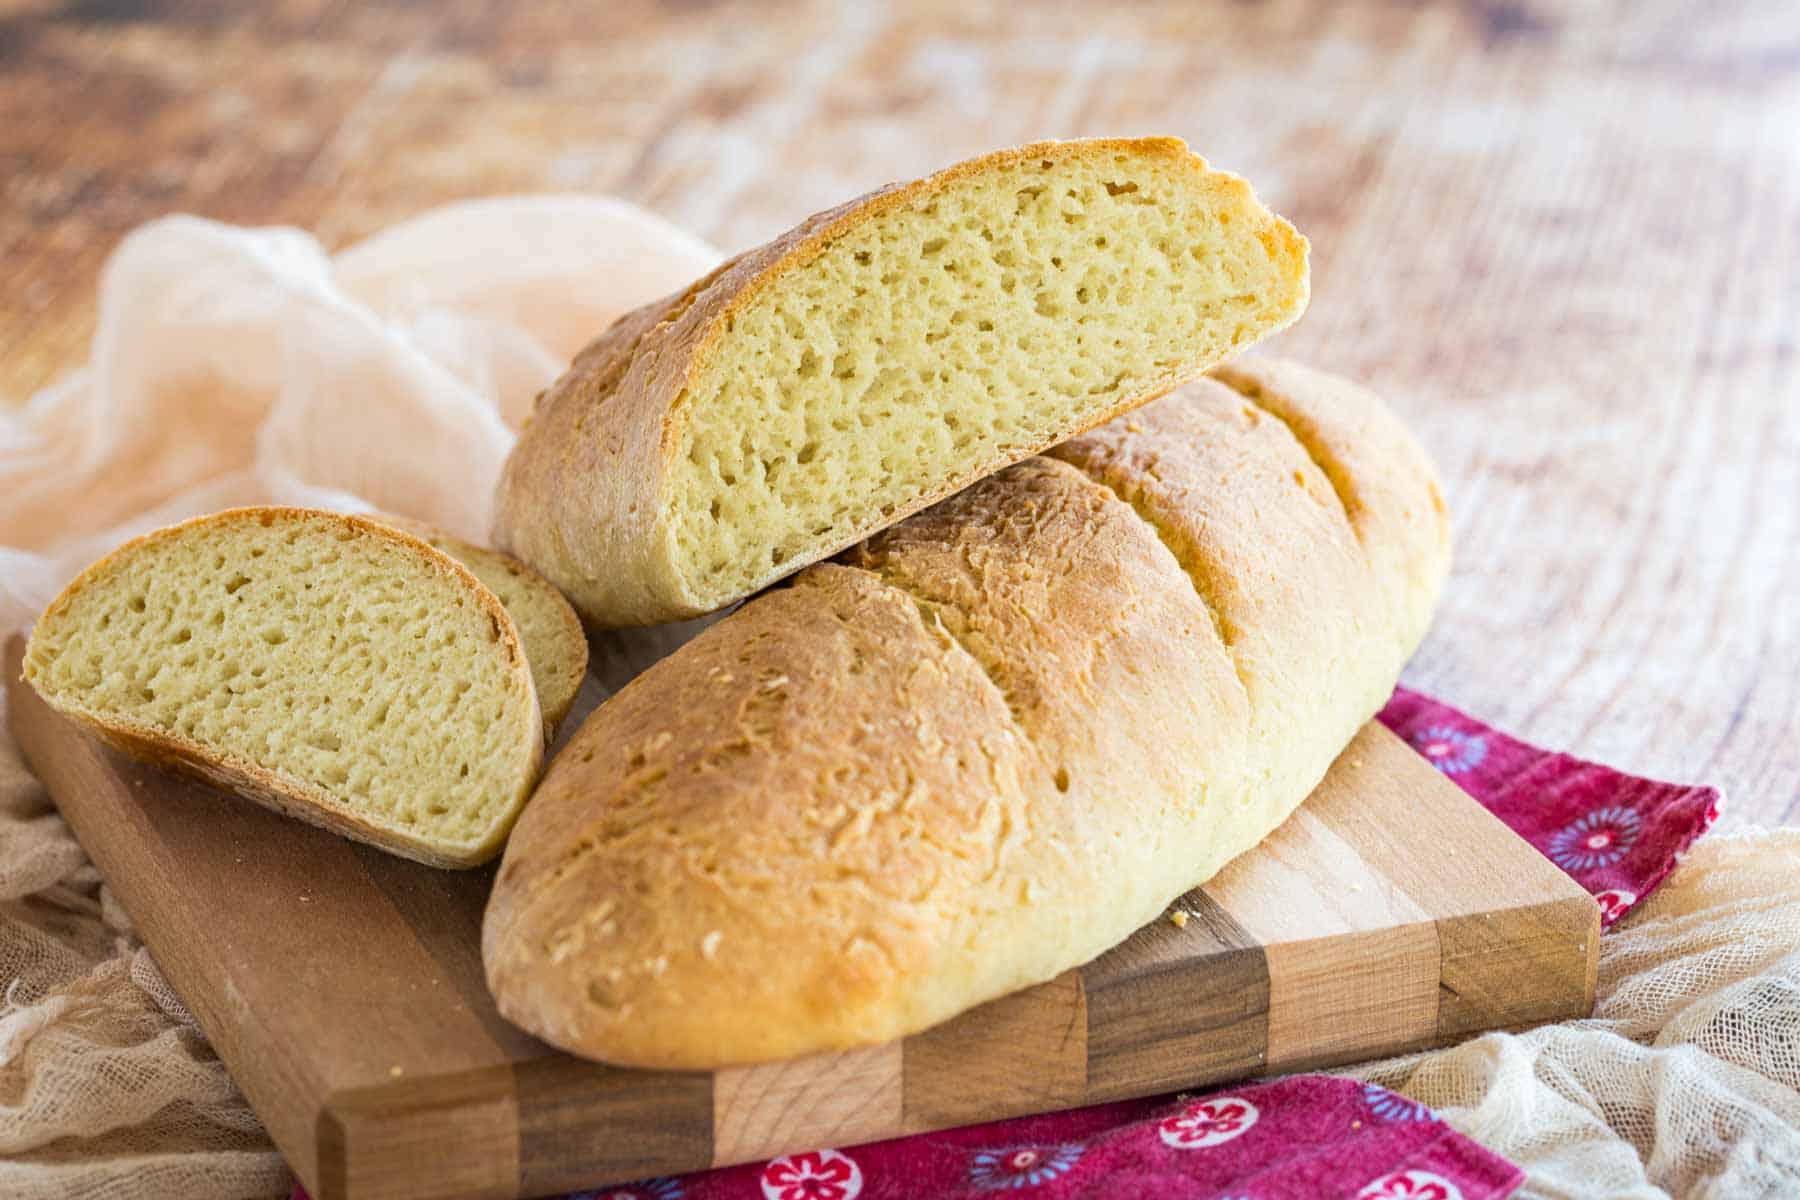
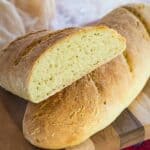
Gluten Free French Bread


Make your dreams of a crusty Gluten Free Baguette a reality with this homemade version! Airy, soft loaves of GF French bread with a perfect crackly crust are amazing to serve with all your favorite dinners and appetizers.
Why You’ll Love This Gluten Free French Bread
Delicious Details
- Cuisine Inspiration: French
- Primary Cooking Method: Oven
- Dietary Info: Gluten-free, Dairy-free
- Skill Level: Challenging
Picture this: you’re wandering the streets of Paris, the scent of the nearby bakery wafting through the air. A man in an apron beckons. He hands you a long loaf of bread with a crackly crust that smells like heaven! You’re tempted to tear into it on the spot.
And then you remember you’re allergic to gluten, and that fantasy goes poof. Never one to give up on my dreams, I tried my hand at making a gluten-free version of these iconic French loaves. Can I just say: fantasy restored! Here’s why this is a must-make:
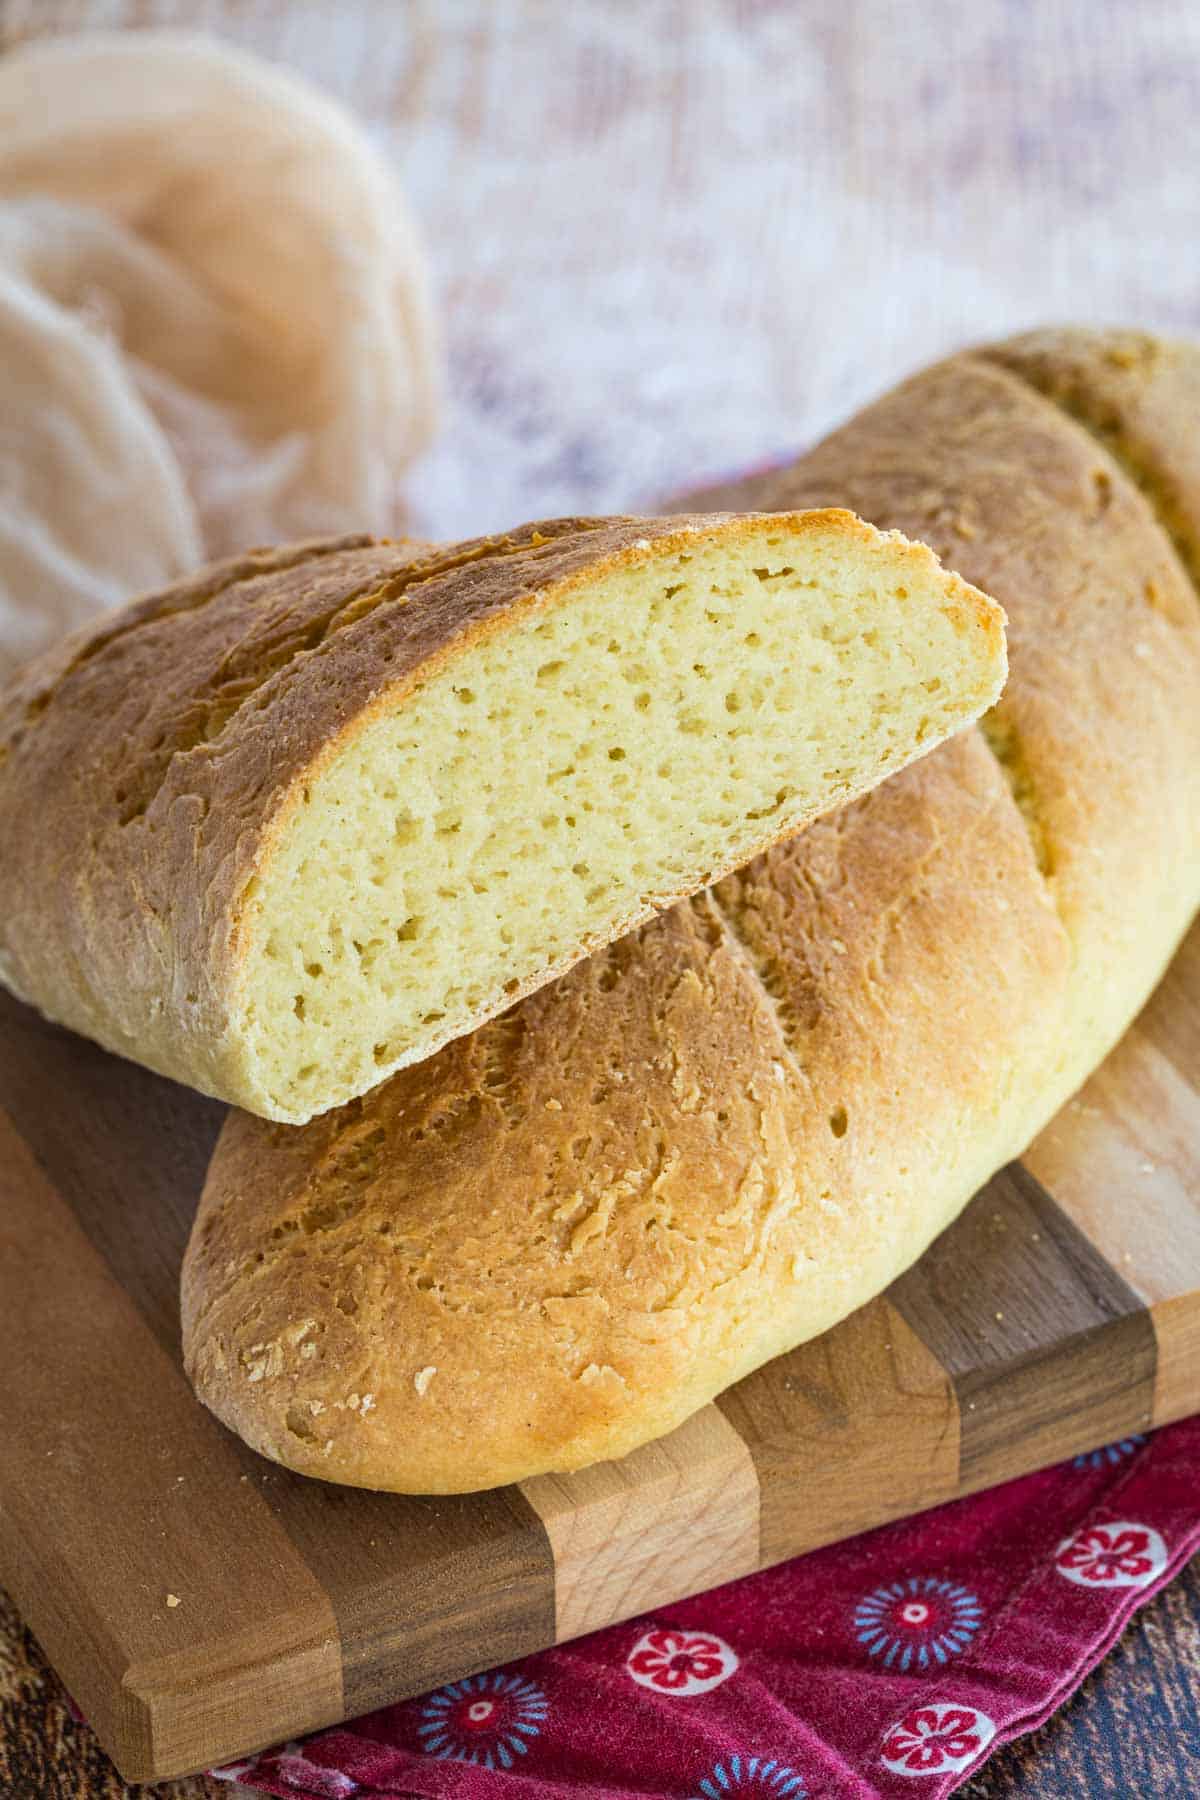
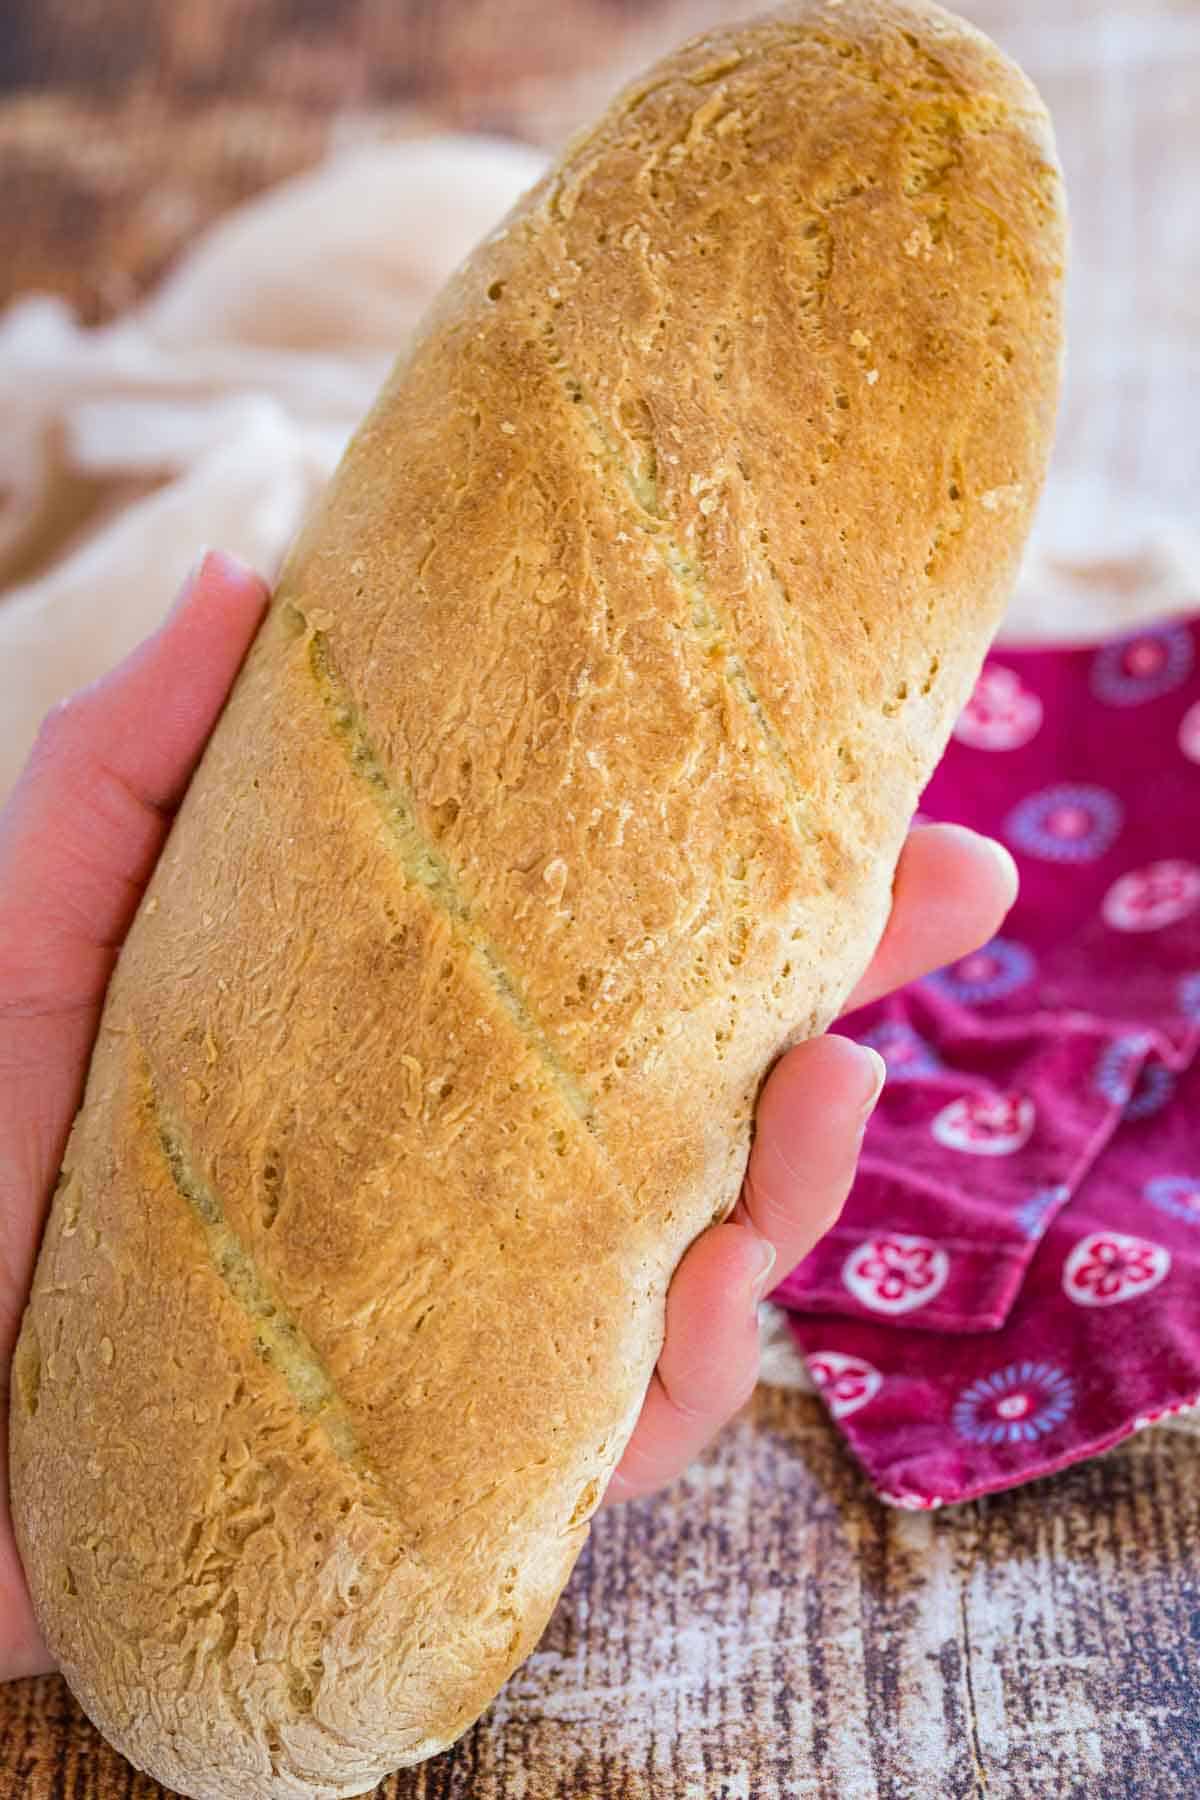
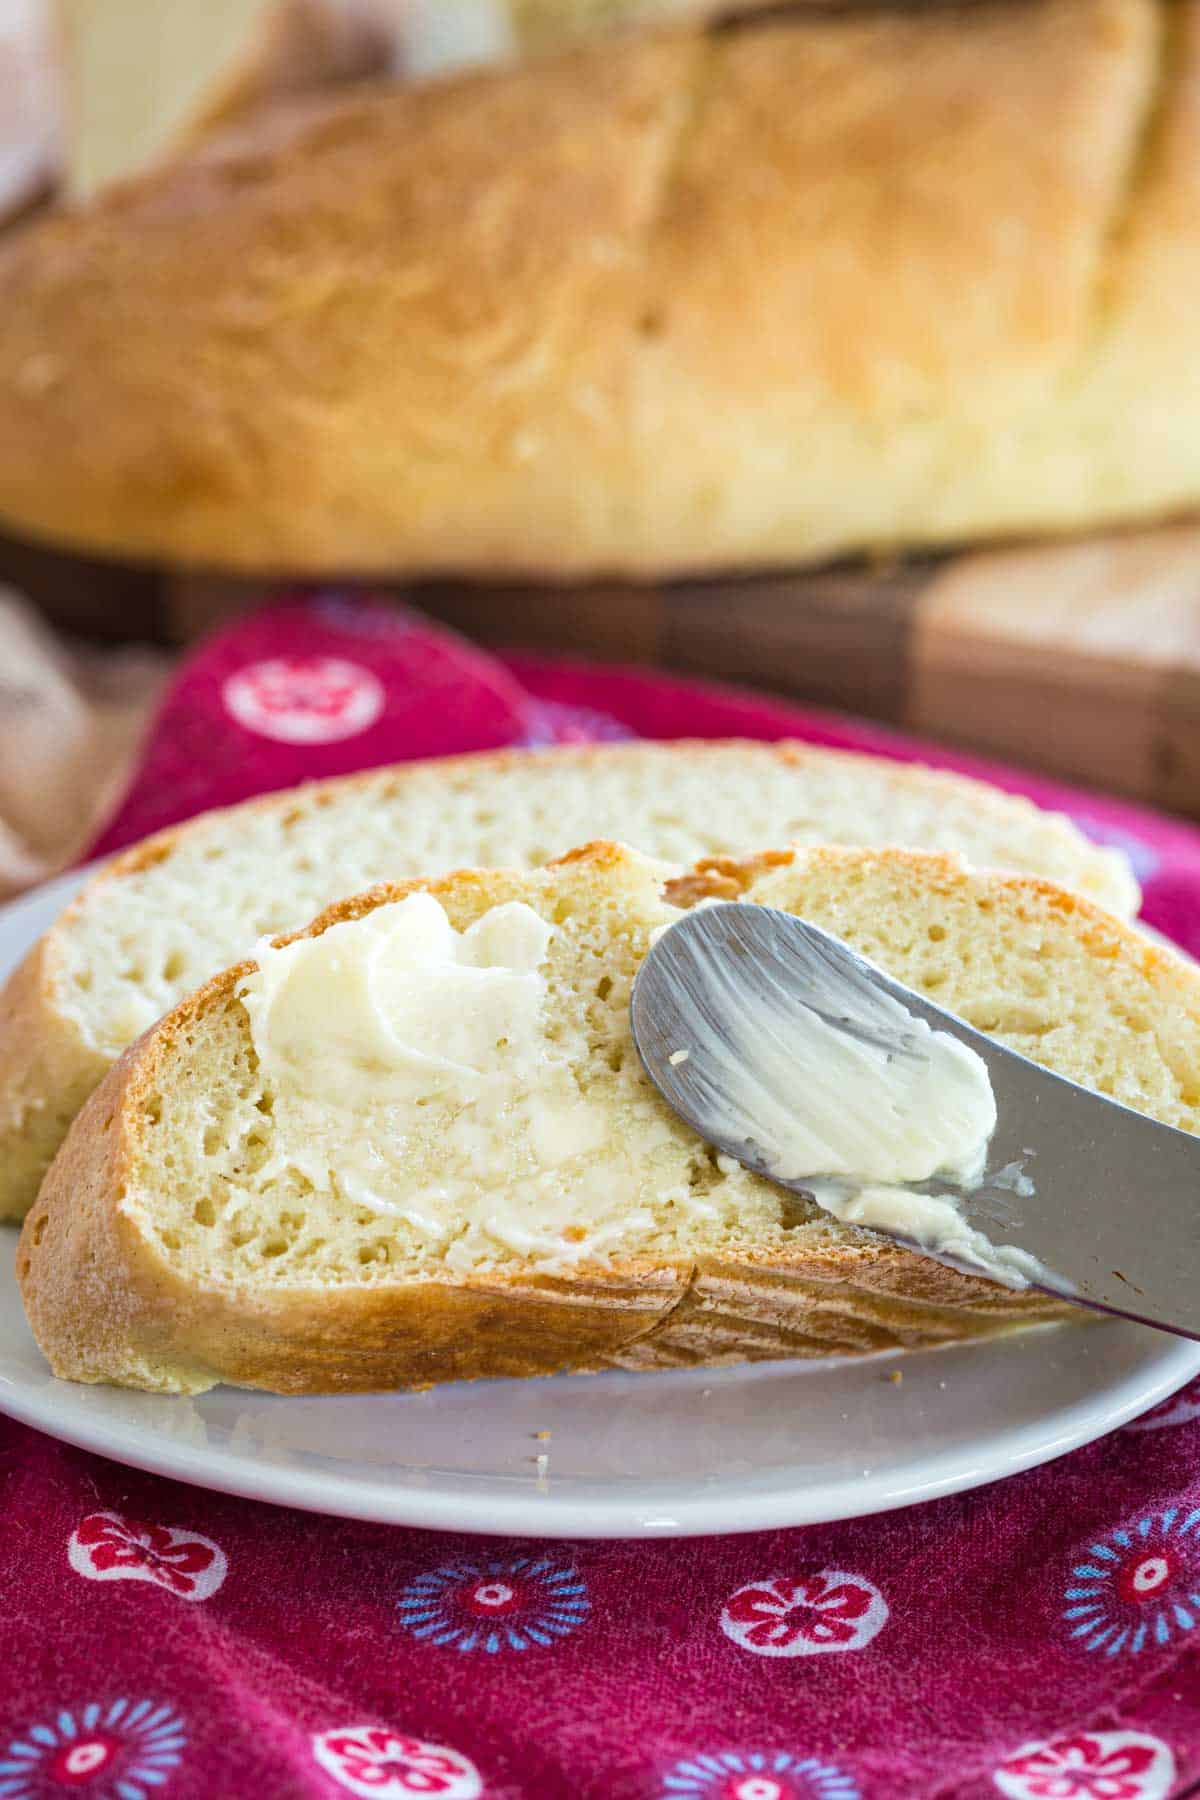
- Classic results. I am so thrilled with how this gluten-free baguette came out. These loaves definitely pass the “fresh” test: give the loaf a gentle squeeze and the crust crunches and splinters, giving way to a pillowy-soft, fluffy crumb. My gluten-eating husband gave them two thumbs up!
- Totally do-able. I list this as a more challenging recipe, but only because there are steps and techniques that require extra attention. But if you follow my detailed directions, these baguettes are easy enough to make.
- Super versatile. From sides to sandwiches, starters to just smearing with butter, they are perfect to serve in all sorts of ways!
Why is it Called a Baguette?
Baguettes are long loaves of bread that are synonymous with France and French culture. And the French word “baguette” translates to “wand” or “baton”, which is fitting for the shape!
What You’ll Need
Here’s a rundown of the ingredients to make Gluten Free French Bread. So let’s gather up everything for this crust baguette. You’ll find the full amounts and detailed instructions in the recipe card at the bottom of the post.
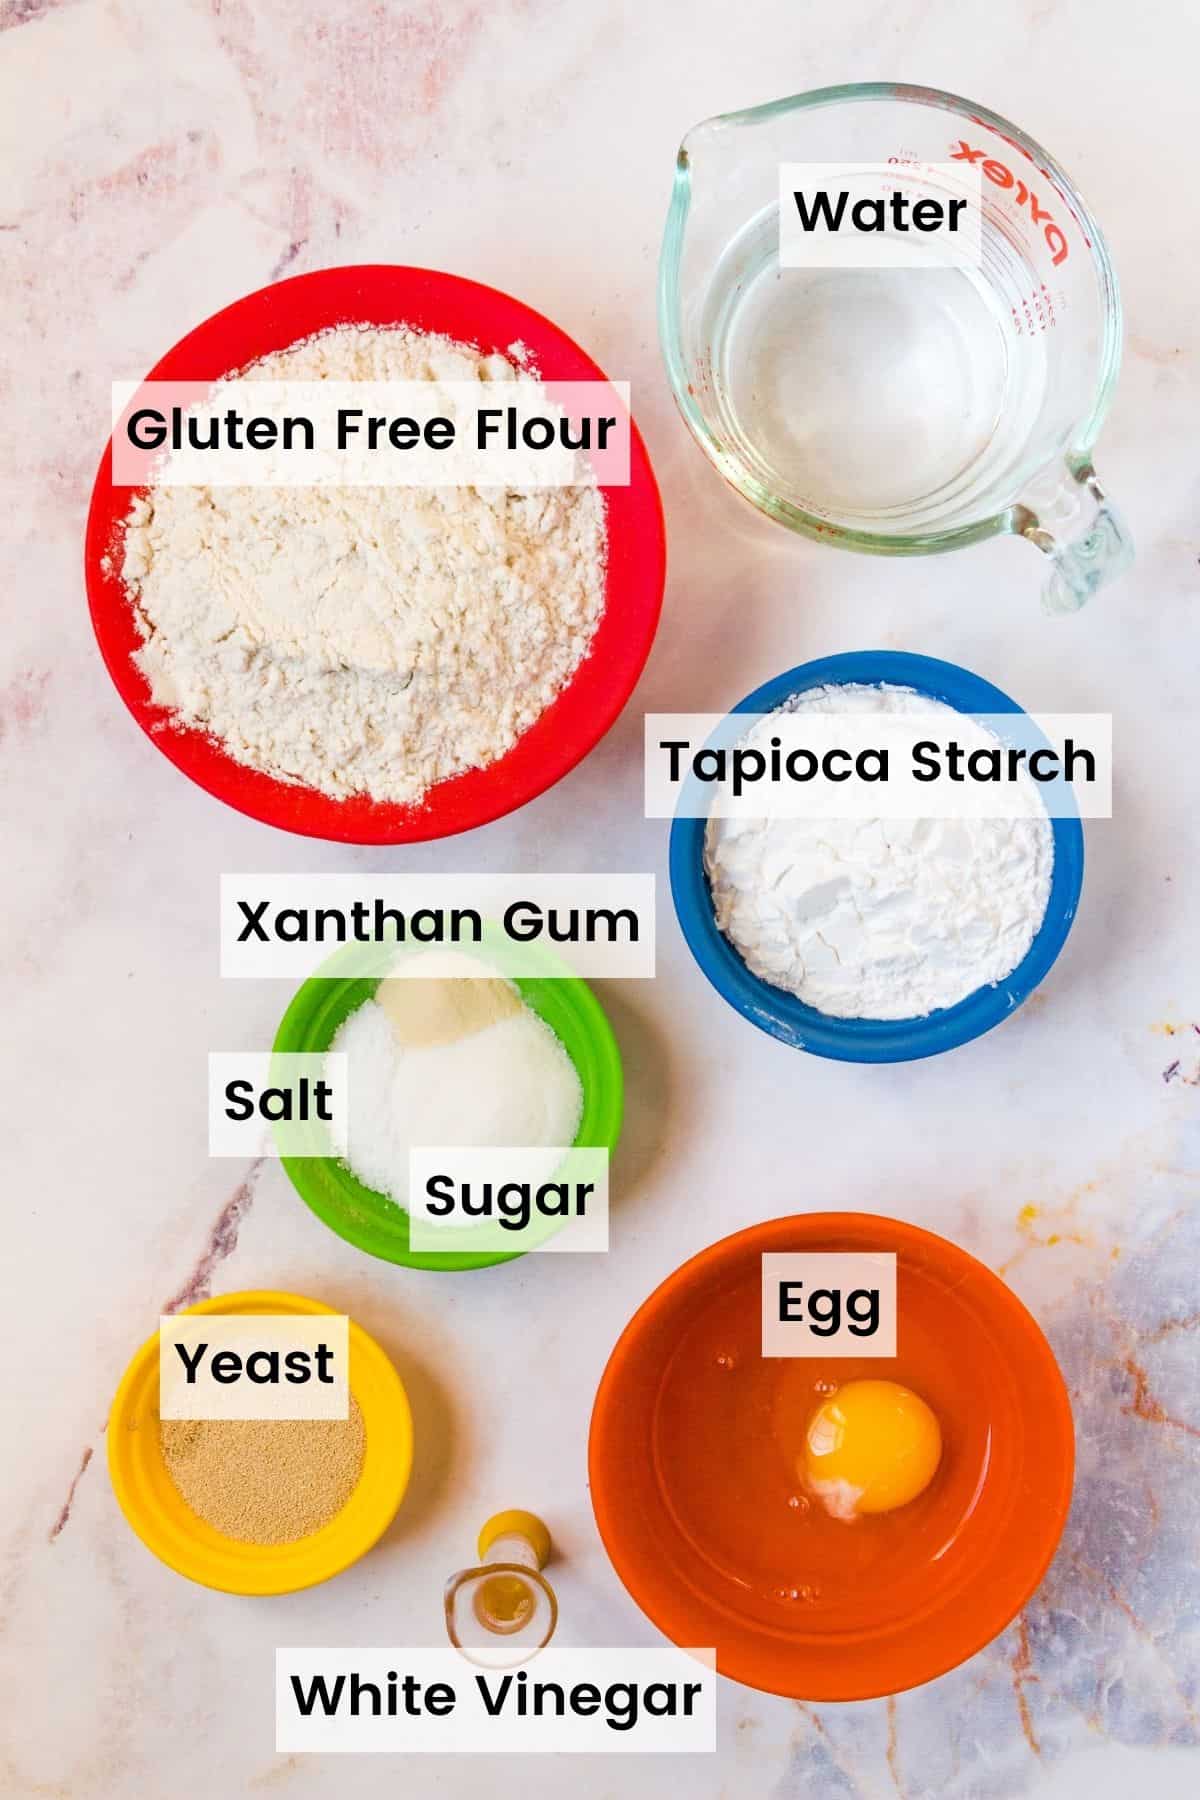
- Gluten-Free Flour: I use King Arthur Measure-for Measure.
- Instant Yeast: Instant dry yeast works great for this bread recipe. Just make sure to check the expiration date! Also be mindful of the temperature of the water you use, water that’s too hot will kill the yeast.
- Sugar: Besides the hint of sweetness, it also helps activate the yeast.
- Xanthan Gum: Helps to thicken and stabilize the dough ingredients.
- Tapioca Starch: This is the secret to a perfectly crusty gluten-free baguette. Tapioca starch also helps bind the ingredients, while bringing chewiness and crispness to the bread.
- Egg: For this recipe, you’ll need one whole egg, as well as one egg white, both at room temperature.
- White Vinegar: The acidity in vinegar helps with the rise of the dough, and enhances the flavor and airy texture of your French bread.
- Salt
How to Make a French Baguette From Scratch
I’ve heard that nothing compares to the texture of the baguettes you’ll find in France. But I sure can try my best! Here’s how to make the best gluten-free French baguettes:
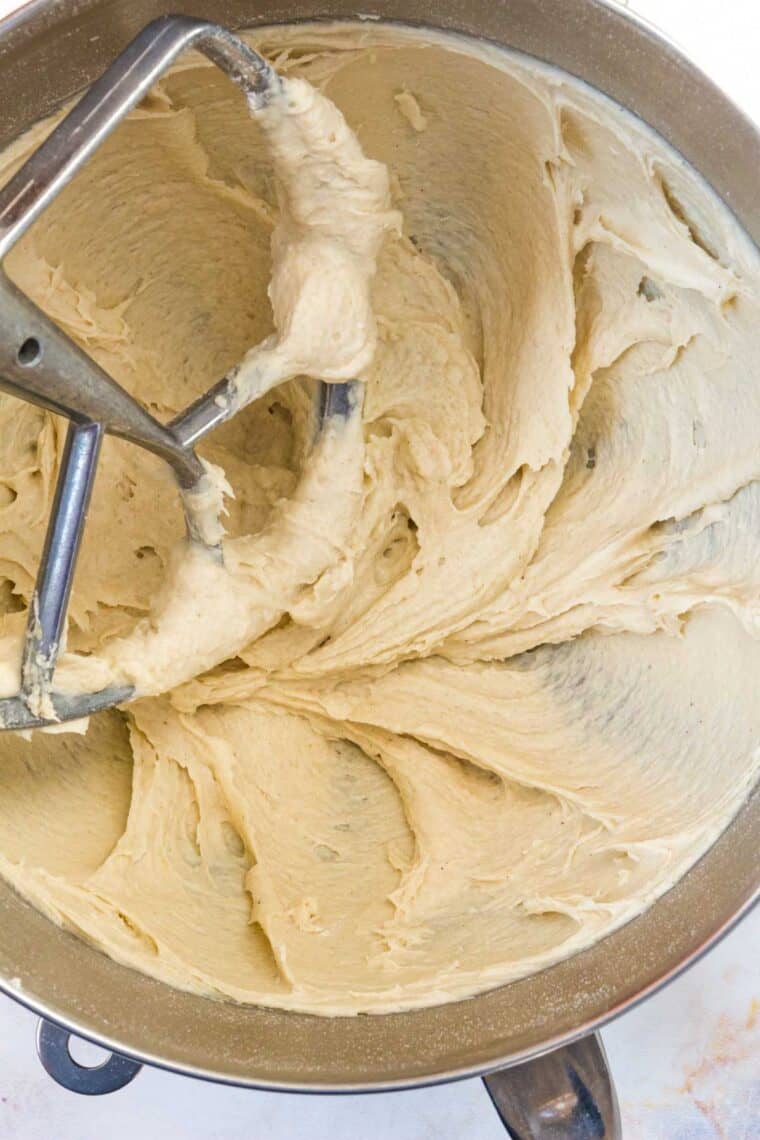
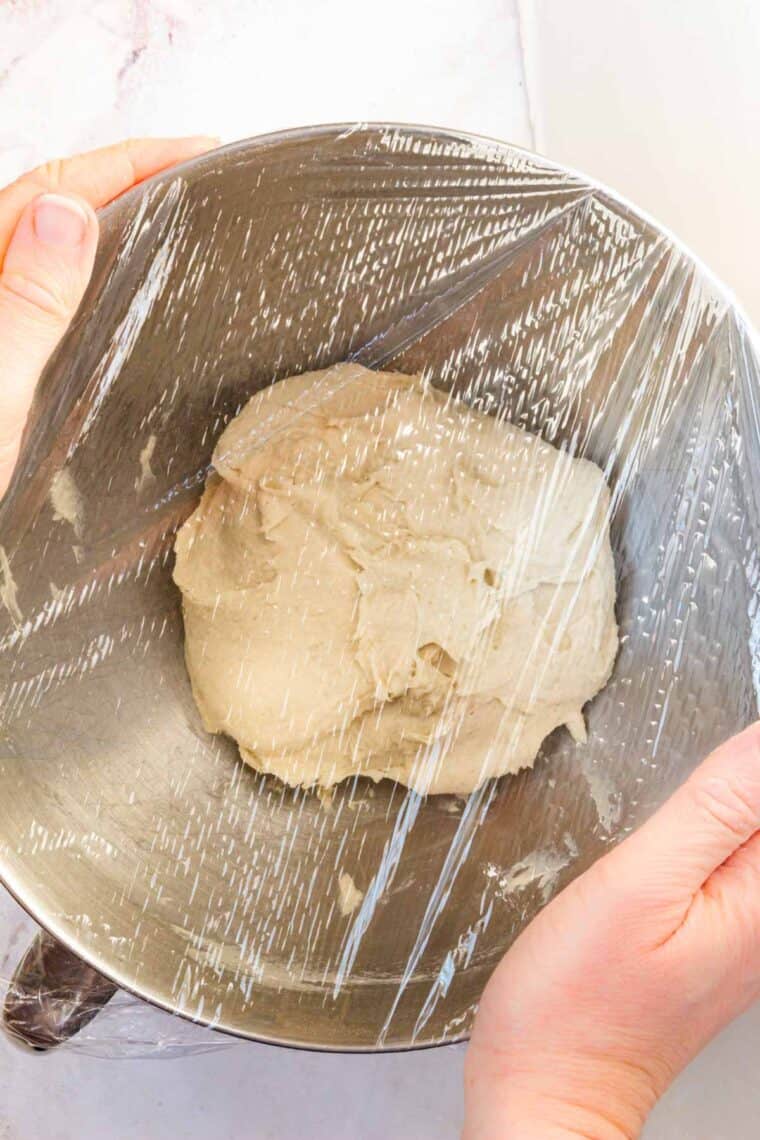
- Make the Dough: In a mixing bowl, you’ll combine the dry ingredients, followed by the wet ingredients. Stir until a whipped dough forms that’s sticky but not wet. If you find your dough is on the wetter side, slowly add in a little more flour until you get the right consistency.
- Chill: Cover the bowl with plastic wrap and proof the dough in the fridge. Aim for an hour at least, but you can even leave it there overnight if you’d like.
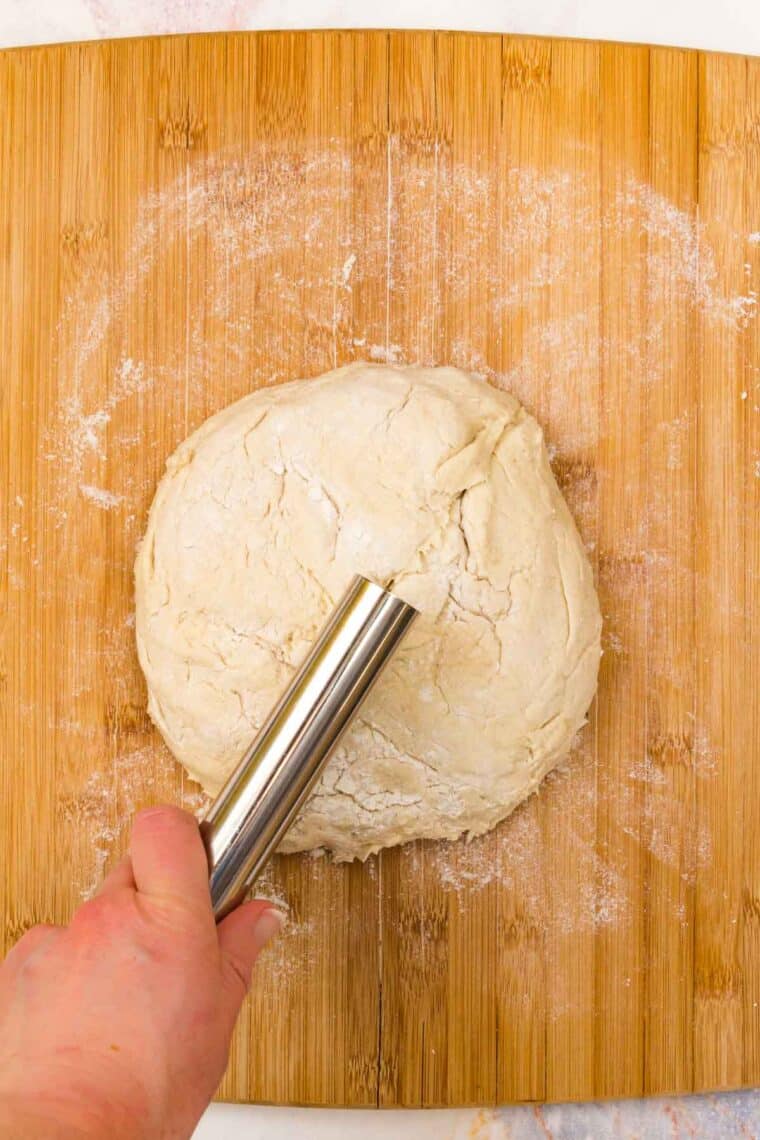
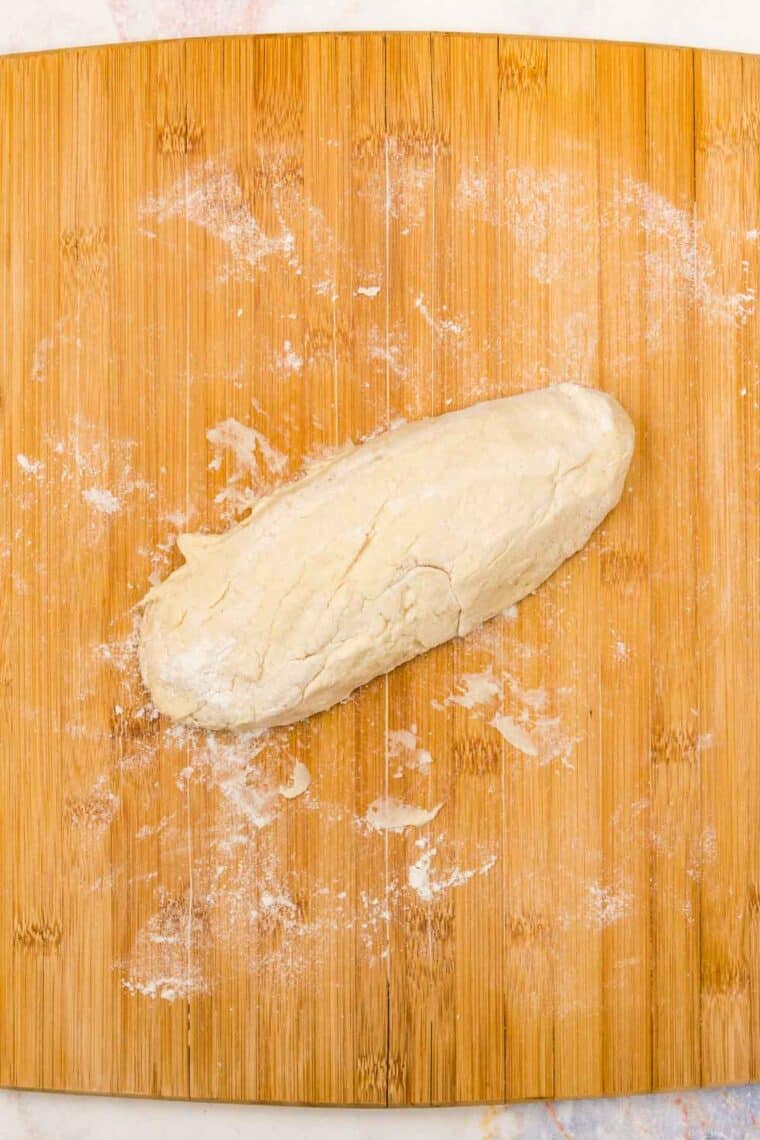
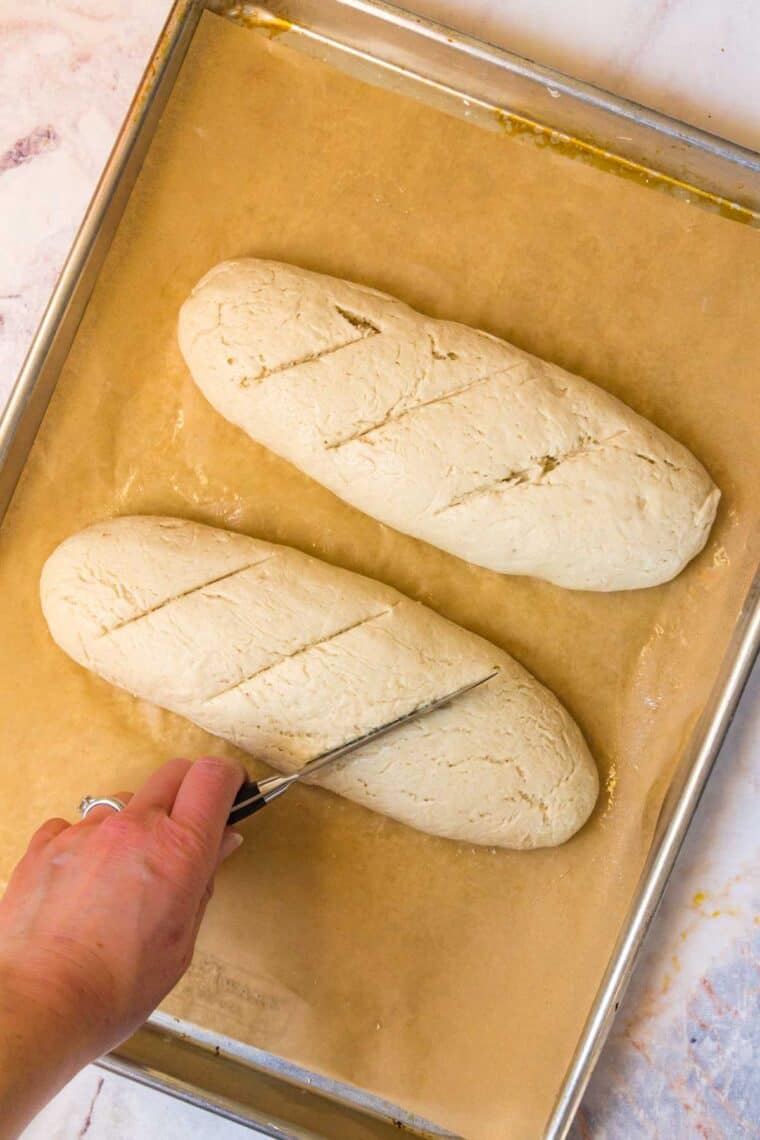
- Divide and shape: When the dough is finished resting, you’ll divide the dough in half on a work surface dusted with tapioca starch. Knead the halves one at a time, and then carefully roll each half into a long baguette shape.
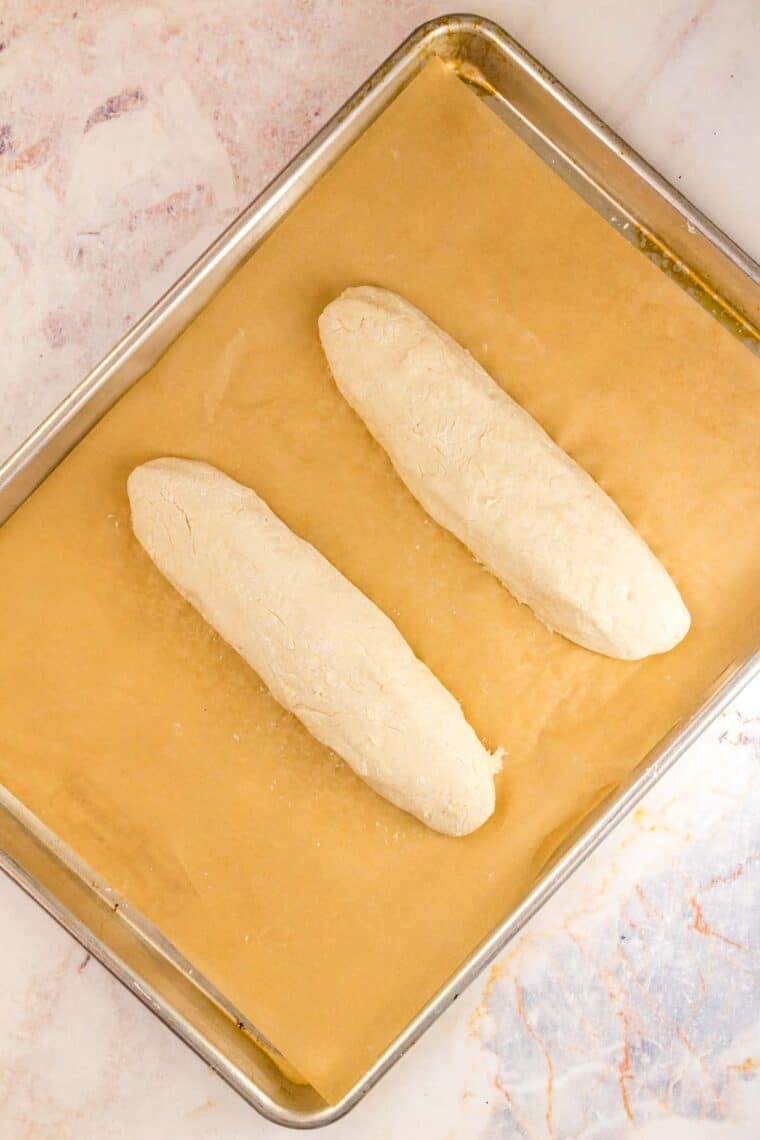
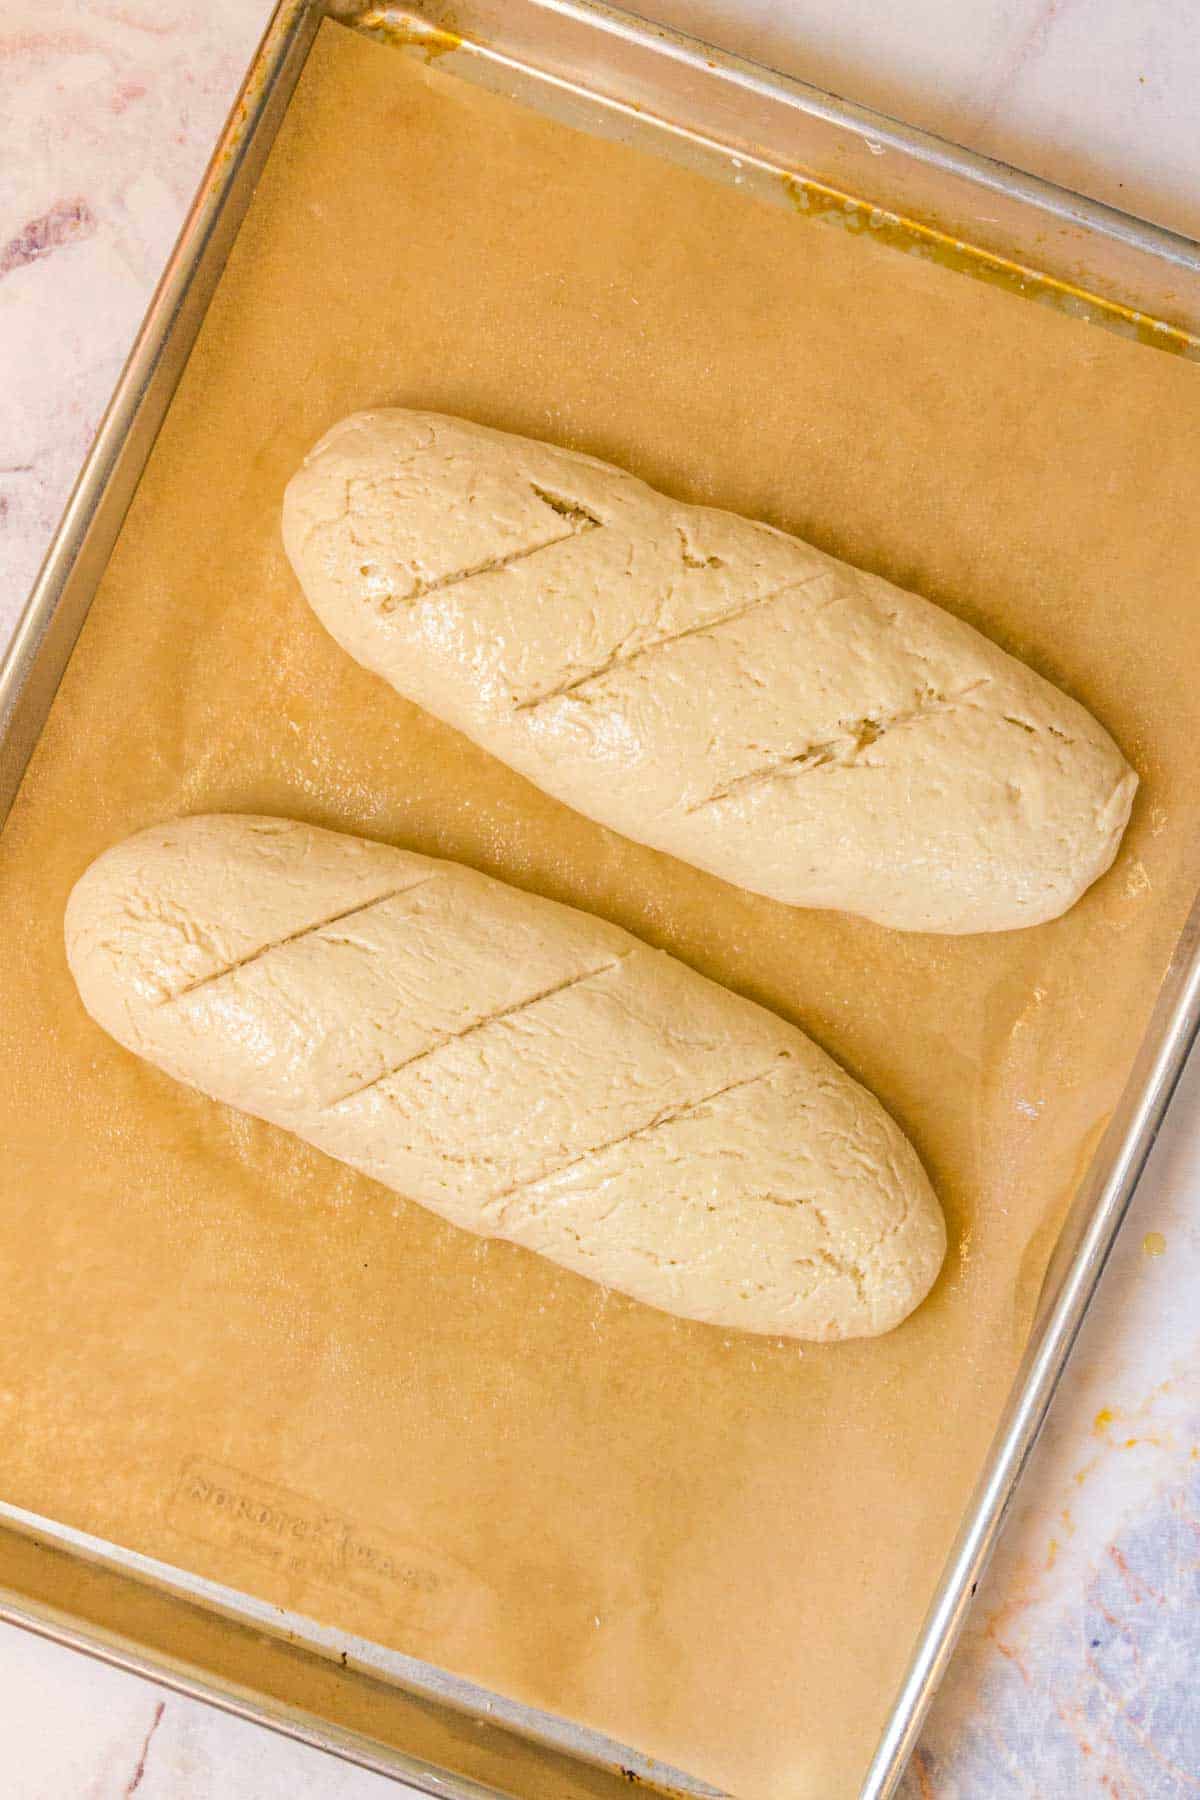
- Rise: Next, cover the loaves with plastic wrap and leave them to rise in a warm location. Check them after 30 minutes, though you can leave them for up to 1 ½ hours. The baguettes should rise until they’re not quite doubled in size. If the loaves start to split, they need to get in the oven! Transfer the loaves to a baking sheet and score the tops of the loaves with a knife and give them a spray with cooking oil.
- Bake: Before baking, place a shallow pan in the bottom of the preheated oven and pour in a couple of cups of boiling water. This will create steam and add moisture as the bread bakes. Finally, bake the baguettes in the center of the oven. You’ll need to rotate the pan once about halfway through the baking time, but resist opening the door more than that and letting out the steam!
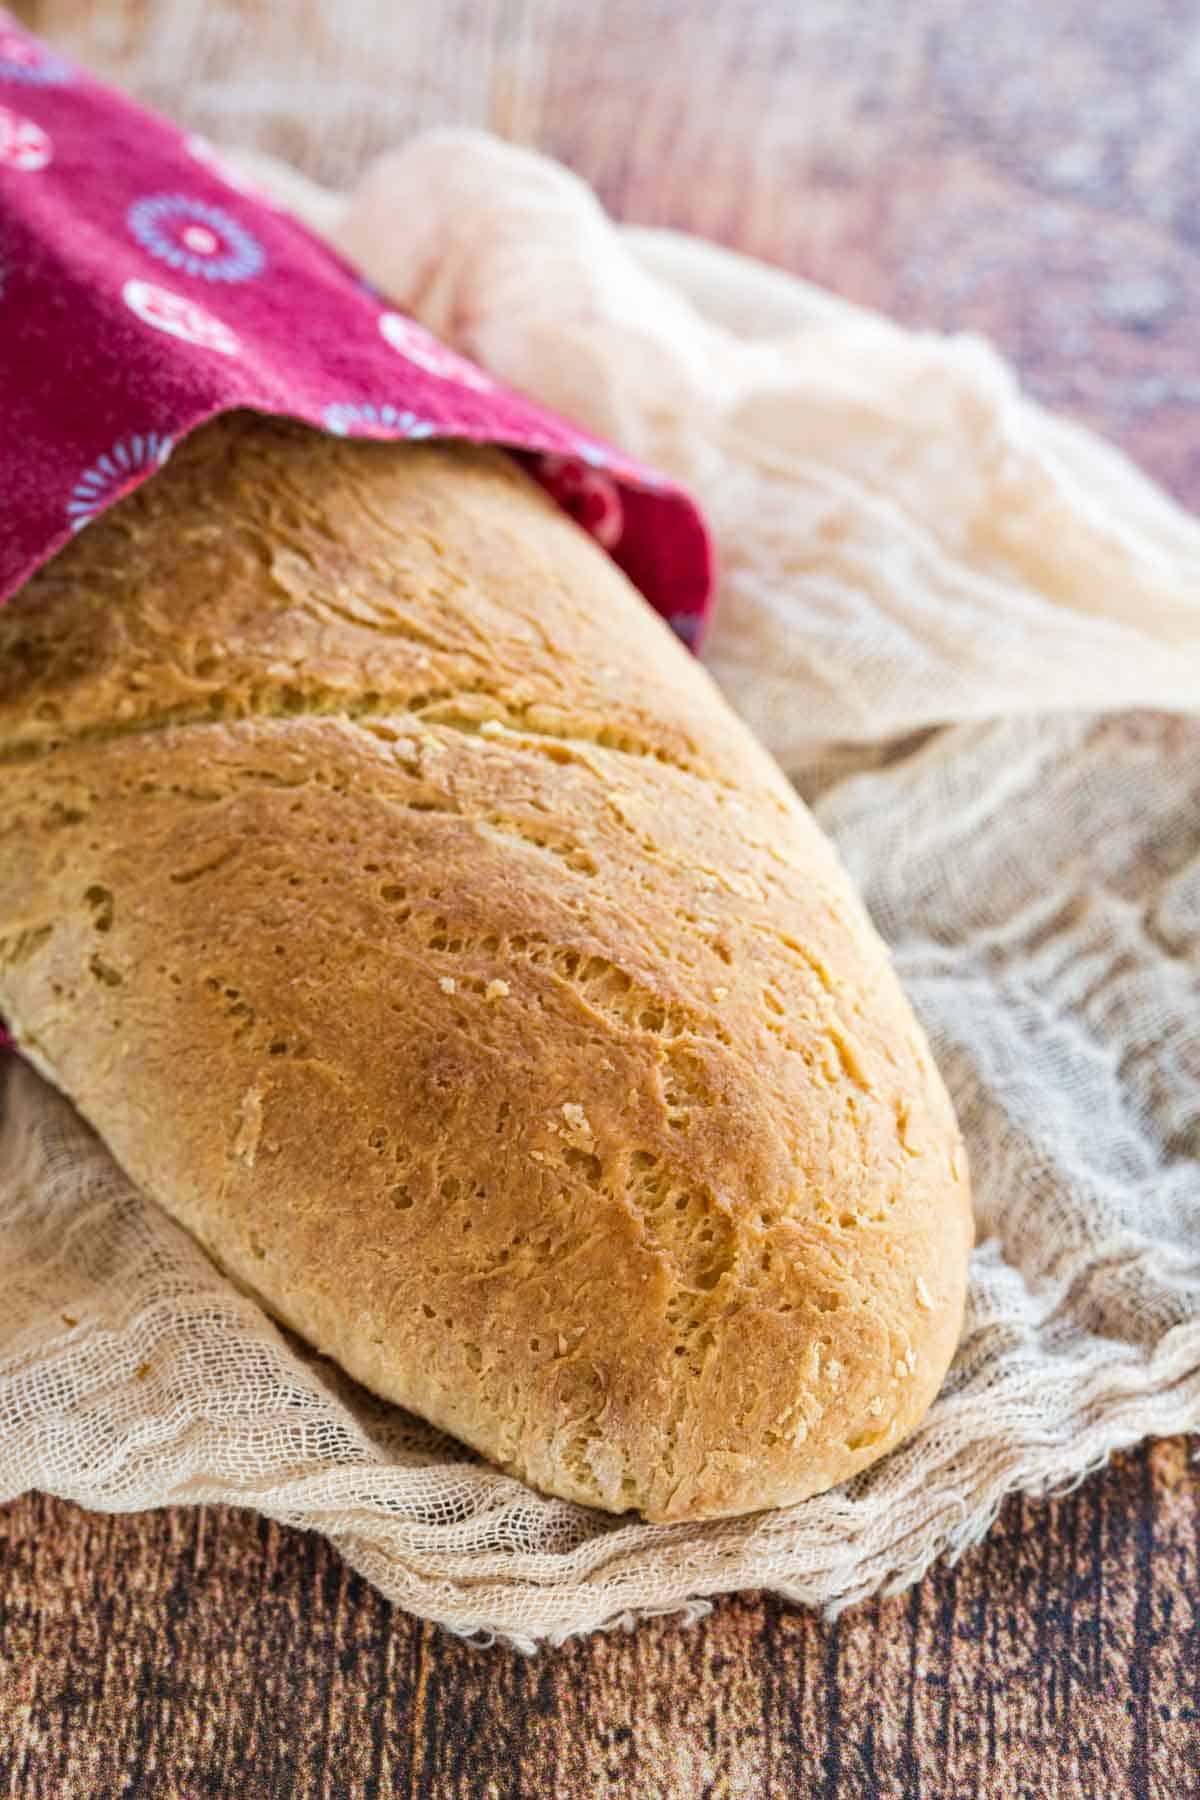
- Cool and enjoy: Remove the baguettes from the oven once they’re baked and golden. Cool slightly before slicing. Voilà! your very own homemade French bread.
Tips for Success
- Measure the Ingredients Correctly: If you have a kitchen scale, use one! If you don’t, avoid using your measuring cup to scoop ingredients like the flour directly from the bag. Instead, spoon the ingredient into the measuring cup and then level it off, for the most accurate measurement.
- What If My Baguette Shape Isn’t Perfect?: French baguettes are meant to look rustic, so perfection isn’t the goal! It’s fine if your loaves have some minor lumps and aren’t uniform in shape. It’s part of the charm.
- What If My Dough Is Really Sticky?: The dough for this gluten-free bread will be sticky, but you can flour your hands a bit if it gets too tacky when handling and rolling.
Serving Ideas
These French baguettes are super versatile. You can simply butter a slice and enjoy as is, tear off pieces to dip into soups and chilis. I’ll share some menu ideas further down. But here are some ways to get creative with slicing and serving!
- Toast slices and top them with diced and seasoned tomatoes to make homemade bruschetta.
- Make crostini that’s perfect for serving as part of a cheese or charcuterie board with some Apple Chutney.
- Dunk pieces or slices of bread into your favorite appetizer dips. I love serving this crusty French bread with my Kentucky Hot Brown Dip or Honey Nut Baked Brie!
- Spread garlic butter over your baguette loaves and broil them for homemade garlic bread.
- Use it for sandwiches such as a Vietnamese Banh Mi or a classic Cuban Sandwich.
Proper Storage
Like most bread loaves, French baguettes are best enjoyed on the day they’re made! However, the loaves will still keep for 2-3 days when stored loosely wrapped at room temperature. The crust will lose some of its crunch after a day or two, though you can revive it by popping the baguette in the oven on low for a few minutes. This should crisp it up again!
Can I Freeze This?
You can go ahead and freeze your French baguettes – we just won’t tell the Parisians.
Freezing these loaves ensures that they don’t go stale before you have a chance to use them, so why not. Freeze the baguettes the day you bake them, either whole or in slices. I find that a freezer bag works best for storing and freezing these airtight.
Whenever you’re ready to serve your bread, just thaw the loaf or slices at room temperature. You can also warm them in the oven or toaster!
Make it a Meal
A French baguette makes a wonderful addition to just about any dish or dinner. I especially love to have it with soups and saucy recipes so I can use the bread to literally mop up the flavors! Here are some of my favorite meal ideas to serve it with:
- Soup and stew. Whether you are serving Instant Pot Creamy Tomato Soup or Crockpot Beef Stew, it doesn’t get better than dunking a hunk of bread.
- Pasta dishes. Italy and France are neighbors, so you can’t go wrong serving French bread with Italian classics like Gluten Free Lasagna, a bowl of Spaghetti Bolognese, or some Gluten Free Baked Ziti.
- French favorites. Whether you go with classic Ratatouille or creative French Onion Stuffed Meatballs, a baguette is the perfect side.
- Cozy chili. Enjoy scooping up Easy Turkey Chili with White Beans or Crockpot Pineapple Chili with a slice.
- Satisfying salads. Make a dinner salad more filling by baking a loaf to serve with Banh Mi Salad or a Leftover Turkey Cobb Salad.
More Gluten Free Bread Recipes

Gluten Free French Baguette
Ingredients
- 2 cups gluten-free flour (I use King Arthur Measure-for Measure), plus an additional 2-4 Tablespoons if needed
- 1/2 cup tapioca starch plus more for dusting the work surface
- 1 1/2 tbsp sugar
- 1 tbsp instant dry yeast
- 2 tsp kosher salt
- 1 tsp xanthan gum
- 1 cup warm water (90-100°F)
- 1 egg + 1 egg white, at room temperature
- 1 tsp white vinegar
- cooking oil spray
Instructions
- In a mixing bowl or the bowl of a stand mixer fitted with a paddle attachment, combine the gluten free flour, tapioca starch, sugar, instant yeast, kosher salt, and xanthan gum. Stir to combine.
- Add the water, egg and egg white, and vinegar and turn the mixer on low to combine. Then turn the mixer to medium and beat with a paddle for 1 minute, then increase to medium-high and beat for another 1 minute. The dough should look whipped and sticky, but not wet. If it is too wet, then mix in additional flour, 2 Tablespoons at a time.
- Cover the bowl and chill in the refrigerator for 1 hour (or up to overnight).
- Line a baking sheet with parchment paper.
- Lightly dust a work surface with tapioca starch. When done resting, place the dough on the prepared work surface. Sprinkle the dough with more tapioca starch and divide it in half. Working with one piece at a time (keep the other half covered with plastic wrap), with floured hands, gently work the dough briefly just until it is smooth. Pat it into a thick rectangle about 8 inches long. Then, starting with the long (8-inch) side, fold it over to form a cylinder. Gently roll it to form a baguette shape with tapered ends. Carefully transfer it to the prepared baking sheet and reshape a bit if needed. Repeat with the remaining dough.
- Spray a piece of plastic wrap with nonstick cooking spray and cover the loaves. Press it to the dough to help the loaves keep their shape as they rise. Don’t seal it tightly, just rest it on the dough. Place the loaves somewhere warm to rise for 30 minutes to 1 1/2 hours, until the loaves are about one and a half their size. Do not let it overproof. If you see the loaves start to split at all, it is time to bake them.
- Towards the end of the rising time, preheat the oven to 450°F. Place an oven-safe pan (preferably metal for safety, as glass can shatter) on the bottom of the oven. Bring 2 cups of water to a boil.
- When the loaves are done rising, use a sharp paring knife or a bread lame to make three diagonal slashes on the top of each loaf. Spray the bread with nonstick spray.
- Place the baking sheet in the oven on the center rack. Pour the boiling water into the pan on the bottom of the oven and quickly close the door to trap the steam inside. Bake for 23-25 minutes, rotating the pan after 18 minutes. The loaves are done when an instant-read thermometer registers 190°F and they are lightly golden all over. Remove from the oven and cool slightly or fully before slicing.
Did you make this?
Leave a star rating to help others know that they should make this recipe.
Share a photo and tag @cupcakesandkalechips on Instagram!
I use grams when measuring for accuracy. Would you add this to your recipe? Thank you
I did not do that when I was first developing these recipes, but I am working my way through them to add in weights. This one is on the list.
I can’t seem to get tapioca starch – can I substitute it for anything else please
I have not tested a substitute for it. You may also see it called tapioca flour – those are the same thing.
I am using C4C gluten free multi purpose flour and it already has Xantham gum in it. Do I need to add more? Please advise and thank you in advance for your response.
Raquel
I do recommend adding more to help with the stretchiness of the dough.
Hi Brianne – Thank you so much for sharing your wonderful recipes. I can’t wait to make this baguette, but I have a couple of question: I use C4C multi purpose GF flour and Xantham gum is already included in the mix/blend. Do I still need to add 1 tsp. per your recipe? Also, regarding the instant dry yeast, can I use the Fleischmann’s RapidRise Instant Yeast? If not, where can I buy the instant dry yeast? Thank you in advance for responding.
Raquel in LA, CA
Sorry for the delayed response. Yes I recommend adding the extra xanthan gum to get the nice, chewy texture. And yes, that is the right kind of year. I usually use SAF which I order form Amazon, but the Fleishmann’s Rapid Rise should be fine.
Can I use egg replacer with this recipe? I am allegic to egg whites
I have not tested it so I can’t say for sure. If you do try it, let me know!
My King Arthur flour contains xanthan gum, do I add more?
Yes, it helps add some extra stretchiness to the dough.