
Gluten Free Pie Crust


My gluten-free pie crust recipe produces the best buttery, flaky pie crust every time, and it’s so easy! This simple dough comes together quickly and can be used for your favorite sweet or savory gluten-free pies, quiches, and pastries.

Delicious Details
- Cuisine Inspiration: American
- Primary Cooking Method: Oven
- Dietary Info: Gluten-free, Dairy-free option
- Skill Level: Easy
Why You’ll Love This Gluten-Free Pie Crust Recipe
Oh, pie. How I love you. Until I settled on this best-ever gluten-free pie crust, I would always stick to my crustless pumpkin pie at the holidays. After being let down by one store-bought crust after another, I FINALLY dedicated the time to making a gluten-free homemade version that was just as buttery, flaky, and sturdy as an original all-butter crust.
It’s safe to say my classic pumpkin pie is no longer crustless! This is the easiest gluten-free flaky crust that you can use for all your favorite pies, tarts, and more.
- A go-to recipe. To make a good pie, you have to have a good, flaky crust with a delicate texture. And that’s exactly what this gluten-free recipe delivers. Plus, it’s super simple to make!
- Simple ingredients. You don’t need any complicated gluten-free substitutes or additives to make this pie dough, and this recipe works with most all-purpose gluten-free flours. The other ingredients, like eggs and butter, are naturally gluten-free.
- Versatile. Some of my family members believe that pie is only for the holidays. And I mean, I love a good pecan pie at Thanksgiving as much as the next girl. But I’ve used this pie crust as a shell for everything from blueberry pie to quiche and gluten-free chicken pot pie. It’s the best for a reason!

Recipe Ingredients
Just like a regular wheat-flour pie crust, this recipe only needs a handful of basic ingredients, including flour, butter, and cold water. It’s important to have the butter, water, and shortening cold so that the end result is light and flaky! I share some detailed notes below. Scroll down to the recipe card for the printable ingredients list with amounts.
- Flour – For this pie crust, you can use your favorite all-purpose gluten-free flour blend.
- Salt – Consider adjusting the amount of salt if you’re using salted butter.
- Sugar – Granulated sugar or light brown sugar will both work here. You can limit the sugar or skip it altogether if you are making a crust for a savory dish, like a quiche.
- Butter & Shortening – You’ll need a half-cup each of cold butter and cold vegetable shortening, cut into small cubes. You can use vegan butter, if needed.
- Ice-Cold Water – The colder, the better.

What Kind of Gluten-Free Flour Should I Use?
While you can make this pie crust with a homemade gluten-free flour blend, I like to purchase mine pre-blended, like you’ll find from King Arthur Flour or Bob’s Red Mill. These brands make good-quality all-purpose gluten-free flours that work well in this pie crust.
I will note that it’s best to use flours without xanthan gum in this recipe. Xanthan gum acts like gluten to give the dough some stretch, but you don’t need that in a flaky pie crust!
How to Make a Gluten-Free Pie Crust
This gluten-free pie crust is very similar to regular pie crust recipes. You’ll combine the cold butter and shortening with the dry ingredients, then add the cold water to form a dough. Easy! Follow along below, and refer to the recipe card for the printable instructions.
- Combine the dry ingredients. In a large mixing bowl, whisk together the flour, salt, and sugar.
- Cut in the butter. Add the butter and vegetable shortening, cutting them into the mixture using a fork, pastry cutter, or two knives. Cut the ingredients together until the mixture forms pea-sized crumbs.


- Add water. Slowly drizzle in the water, one tablespoon at a time. You might not need to use the entire half cup. After each tablespoon, mix gently. When the dough comes together, stop adding water.
- Chill the dough. Lightly dust a work surface with gluten-free flour and turn the dough out onto it. Press and shape the dough into a ball and cut it in half. Flatten the two pieces into discs, and cover each one with plastic wrap. Refrigerate for at least one hour.


How to Par-bake a Pie Crust
Par-baking, sometimes called blind-baking, is an important step in many pie recipes. It involves partially baking the crust so it can hold up to the filling without becoming soggy. This is especially key in no-bake desserts where a baked crust is necessary. Here’s how to par-bake your prepared gluten-free pie crust:
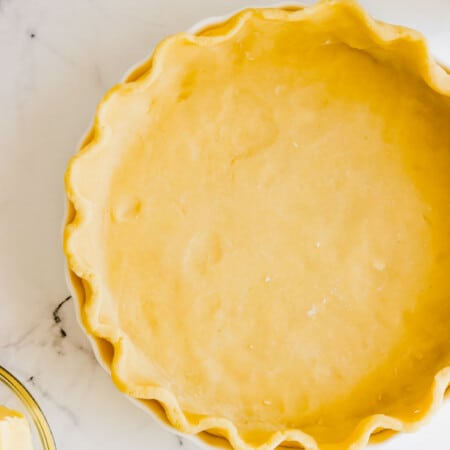
- Shape the crust. Once the dough has chilled, roll it out on a floured surface into a 12-inch circle. Transfer to a 9-inch pie dish and gently press in. Trim any excess dough, and shape the edges as you prefer.
- Bake. Cover the crust with baking paper and fill with pie weights (dried beans or rice also work well). Bake at 400°F for 15 minutes, then remove the pie weights. Prick the pie crust with a fork and bake for 5-10 more minutes for a partially baked pie crust, OR bake for 15-20 minutes more for a fully baked pie crust.


Tips for Success
- Avoid sticky dough. Gluten-free doughs can be notoriously sticky. One of the worst things is rolling out the perfect pie crust, only to have it stick like glue to your work surface! I avoid this by rolling out the dough between sheets of parchment or wax paper. Just peel the paper away when it’s time to put the crust into your pie pan.
- Use the right tools. While you can use a fork, a simple and inexpensive pastry blender makes it much easier to cut the butter and shortening into the flour.
- Save time with a food processor. A food processor is another great way to quickly cut the butter and shortening into the dry ingredients. Just a few pulses and you’ll have perfect pea-sized crumbs, ready to go.
- Bake at a high temperature. Since the gluten-free flour interacts with shortening and butter differently than regular flour, make sure you preheat the oven well, and to the right temperature (400°F). This allows the melted butter to form flaky layers correctly with the dry ingredients.
- Use parchment for blind baking. Since gluten free pie dough can be a bit sticky and tender, you’ll want to roll it out on parchment to transfer to the pan, and you’ll want top set your pie weights on top of the parchment, not right on the crust itself.
Make-Ahead and Storage
- Make it ahead. Prepare the gluten-free pie dough, but instead of rolling it out, refrigerate the wrapped dough discs for up to 3 days. When you’re ready to use it, let it sit at room temperature for up to 15 minutes, until it’s soft enough to roll.
- Freeze the dough. To freeze your pie crust, freeze the wrapped discs of dough for up to three months. Thaw overnight in the refrigerator before rolling and baking.
- Refrigerate the crust. You can roll out and shape your pie crust in the pie plate, then cover and refrigerate the prepared crust for up to 3 days before par-baking and filling.

Ways to Use This Gluten-Free Pie Crust
This versatile crust is ready to pair with any filling you like. You really can’t go wrong here. Fill this crust with apple pie filling for a homemade apple pie (fall isn’t complete without it). Then there’s blueberry pie, peach pie, strawberry rhubarb pie, and cherry pie. And don’t forget light-as-air lemon meringue pie! Here are some more ways to put your homemade gluten-free pie crust to good use:
- Quiche. This crust is the perfect shell for a bacon cheddar quiche, quiche Florentine, quiche Lorraine, or any of your favorite recipes.
- Chocolate pies. Try this chocolate chess pie or my chocolate chip cookie pie.
- No-bake desserts. Use your par-baked gluten-free crust to make creamy s’mores pudding pie.
- Pastries. Use this flaky dough to make apple turnovers!
More Gluten-Free Crust Recipes
Gluten-Free Pie Crust
Equipment
- Oven
Ingredients
- 2 1/2 cups gluten-free 1:1 flour
- 1/2 teaspoon salt
- 3 teaspoons granulated sugar
- 1/2 cup unsalted butter , cold and cubed
- 1/2 cup vegetable shortening , cold and cubed
- 1/2 cup ice-cold water
Instructions
- In a large mixing bowl, whisk together 2 1/2 cups gluten-free 1:1 flour, 1/2 teaspoon salt, and 3 teaspoons granulated sugar.
- Add 1/2 cup unsalted butter and 1/2 cup vegetable shortening and cut into the flour mixture using a fork or pastry cutter until you achieve well-combined pea-sized crumbs.
- Slowly drizzle up to 1/2 cup ice-cold water, one tablespoon at a time (the full amount may not be needed), and mix until dough comes together.
- Lightly dust a work surface with flour and turn out the dough onto it.
- Pack the dough into a ball and cut it in half.
- Flatten the two pieces into two discs and cover each one with plastic wrap and refrigerate for at least 60 minutes.
- Once the dough has chilled, roll it out on a floured surface into a 12-inch circle.
- Transfer to a 9-inch pie dish and gently press in.
- Trim any excess dough and decorate the edges as you prefer.
- Line the pie dough with baking paper and fill with pie weights (dried beans or rice also work well).
- Bake at 400F for 15 minutes and then remove the pie weights.
- Prick the pie crust with a fork and bake for 5 – 10 more minutes for a partially baked pie crust, OR bake for 15 – 20 minutes more for a fully baked pie crust.
Notes
- Makes 2 pie crusts.
- This dough can be prepared, wrapped tightly, and refrigerated for up to 3 days. (If it is too cold to roll out when needed, leave at room temperature for 10 to 15 minutes.)
- To freeze the pie dough, wrap it tightly in plastic wrap and store for up to 3 months. Thaw overnight in the refrigerator.

Did you make this?
Leave a star rating to help others know that they should make this recipe.
Share a photo and tag @cupcakesandkalechips on Instagram!
So you don’t normally par bake a crust if you’re making a cooked apple pie but because this one is gluten free do you have to do anything like that? I’d like to make this recipe as a cooked fruit pie wondering if there’s specific instructions
Generally you can use the directions of the pie recipe you are preparing. I usually make a dutch apple pie, and prefer to parbake it for that recipe, but if your favorite apple pie doesn’t call for parbaking, it should be fine.
We have been looking for a flaky pie crust and this was a winner on my first try. 3 more pies are in the works.
Which gluten free flour they are all a little different and the amounts of flour uses would be different. Which one did you use?
Bob’s and King Arthur are both good options for this recipe.
The flavor was spot on and it was pretty easy to make. But mine came out pretty crumbly rather than flaky! What could I have done wrong? Not enough water perhaps?
Yes, I would try a bit more water. Gluten free crust can be a touch crumbly.
This works with regular NON xanthan gum gf flour??
I have not tested it because I usually use a blend with xanthan gum. I think given the texture of pie crust it might be OK. Report back if you try it!
Can the butter be subbed out for plant butter like Miyokos?
I haven’t tested it, but I would expect it would work just fine.
Can I make a double pie., like cherry or apple
Yes, you can!