
Cherry Pie Filling


This homemade Cherry Pie Filling is bursting with sweet-tart cherry flavor and comes together with just a handful of simple ingredients. Whether you use fresh cherries during cherry season or frozen cherries any time of year, you’ll end up with a glossy, thick filling that’s so much better than anything from a can. Make a cherry pie, fill pastries, drizzle it over cheesecake or ice cream, and so much more!

Delicious Details
- Cuisine Inspiration: American
- Primary Cooking Method: Stovetop
- Dietary Info: Gluten-free, Dairy-free
- Skill Level: Easy
Once you make homemade cherry pie filling from scratch, you’ll never go back to canned. This recipe let’s you adjust the sweetness to match your cherries and your own taste, so the bright cherry flavor really shines instead of getting overpowered by too much sugar.
Of course it’s perfect for a classic cherry pie, but that’s only the beginning. You can spoon it over cheesecake or ice cream, fill turnovers, top dessert dips, and so much more. Once you make it yourself, you’ll be using it all the time!
Why You’ll Love This Homemade Cherry Pie Filling
It’s beautifully colored and tastes good, too! Here’s why you’ll want to make this cherry pie filling recipe:
- Better than a can. Fresh cherries, simple ingredients, and no artificial ingredients let the real cherry flavor shine.
- Simple ingredients. A quick scan of the ingredients list will show you only need a handful of basic items.
- Naturally gluten-free. All of the ingredients in this recipe are gluten-free, making this an easy choice for those who need to avoid gluten.
- Make it ahead. This cherry pie filling freezes well so you can have it on hand anytime you want to make a pie or pastry.

Recipe Ingredients
Here’s an overview of the ingredients in homemade cherry pie filling. Be sure to scroll down to the recipe card at the end of this post for the full ingredient amounts.
- Granulated Sugar: You’ll start slow with the sugar, adjusting to taste depending on the sweetness of the cherries.
- Cornstarch: This is your thickener.
- Water
- Cherries: You can use fresh or frozen cherries.
- Lemon Juice: From a freshly squeezed lemon, preferably.

What Cherries Are Best For Cherry Filling?
The best cherries for homemade cherry pie filling depend on what you prefer! You can use sweet cherries to make pie filling, in which case you can reduce the amount of sugar a bit. Or, you can use tart cherries, meaning that you’ll need to add more sugar to balance them out. You can also use a combination of cherries.
Can I Use Frozen Cherries for Cherry Pie Filling?
Yes, frozen cherries work well in this pie filling recipe. Toss them right in from the freezer, but you will use less water than fresh ones because frozen cherries tend to give off more liquid.
🍴 In the Cupcakes & Kale Chips Kitchen…
- Small Strainer – I like to use these mini colanders when I am washing berries or cherries.
- Cherry Pitter – this little gadget makes it so much quicker and easier to prep those cherries.
- Silicone Spatulas – helps with stirring and scraping the hot filling from the corners of the pan so it doesn’t burn.
How To Make Cherry Pie Filling
It’s very simple, so let’s start making cherry filling:
- Get started. Wash and put your cherries. Whisk granulated sugar, cornstarch, and water in a medium saucepan. USe the amount of water based on whether you are using fresh or frozen cherries.


- Stir in the cherries. Add the cherries and lemon juice to the saucepan and bring to a boil over medium heat, stirring constantly to dissolve the cornstarch and sugar and avoid burning.
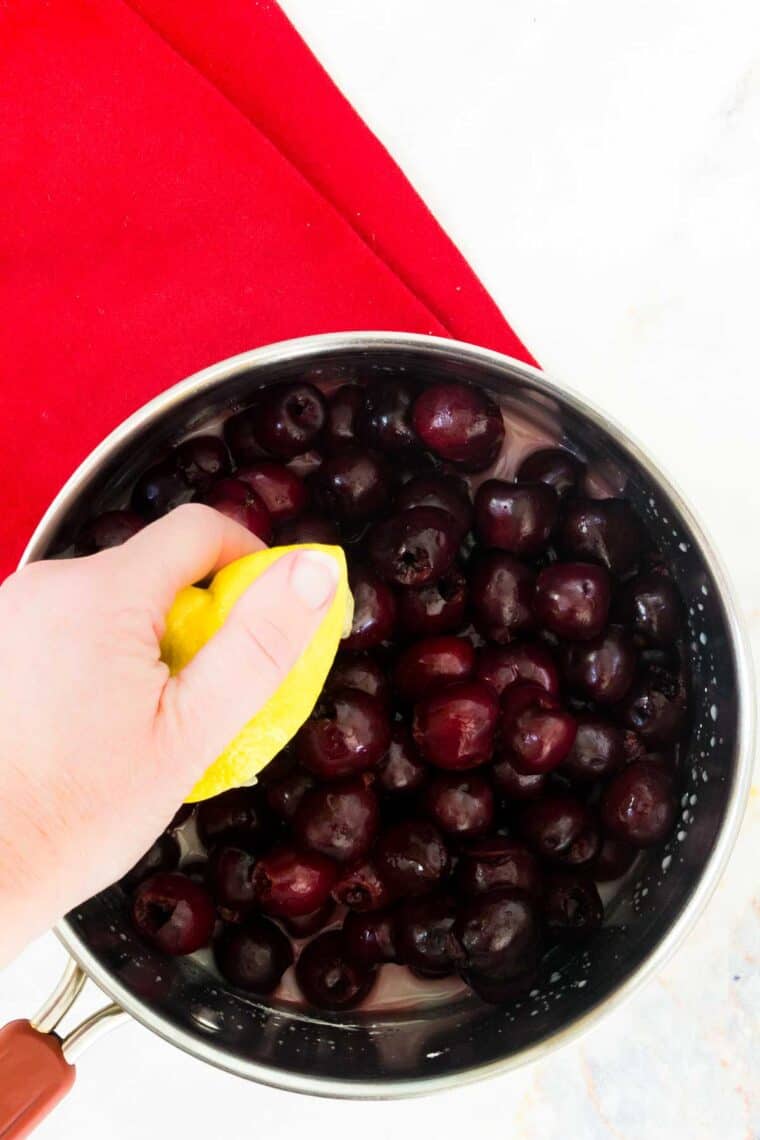

- Simmer. Reduce the heat to low and simmer till thickened, stirring constantly. Carefully taste the filling (be careful, it will be very hot) and add additional sugar or lemon juice, to taste.
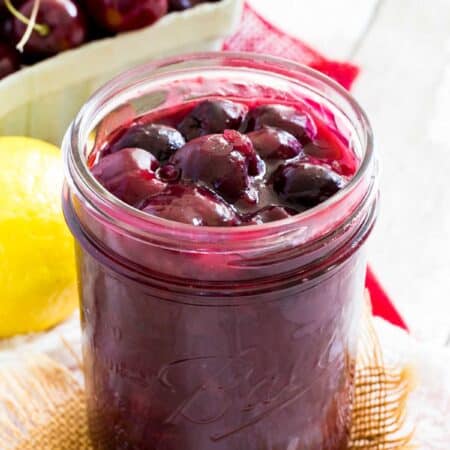
- Cool, then use. Cool slightly to use as a topping or sauce, or cool completely to use in pies, cobblers, etc
Tips for Success
Follow my easy tips below to help you make the best homemade cherry pie filling:
- Buy pitted cherries. If you can find a bag of pitted cherries in your grocery store, this will save you some prep time! Pitting cherries is not difficult, but it can be time-consuming.
- Use frozen cherries. It’s perfectly fine to use frozen cherries when making cherry pie filling (a bonus is that you won’t have to pit the cherries). Make sure to thaw the cherries in the fridge before making the filling.
- Make a double batch. I encourage you to make a double, or even triple, batch of this recipe when cherries are in season. You can freeze the cherry filling you don’t plan to use immediately, so you can make a cherry pie whenever you wish!
- Taste as you go. Start by adding the lowest amount of sugar advised, then gradually increase it if you need to. By doing this, you’ll make sure you don’t oversweeten the cherries.
Proper Storage
Cherry pie filling is great to make ahead. Just follow these storage instructions:
- Refrigerate – Place cooled cherry pie filling in an airtight container (I like to use a jar with a tight-fitting lid) and store it in the fridge for up to 1 week.
- Freeze – Place the cooled filling in a freezer-safe bag, press out any excess air, and store it in the freezer for up to 3 months. Thaw the filling in the fridge before using it in a recipe.

Ways To Use Homemade Cherry Pie Filling
There are so many great ways to use your homemade cherry pie filling. The obvious choice is pie, but you can use it in pastries, crisps, and more. Here are a few suggestions for what you can do with cherry filling:
- In a pie. First, make a batch of my flaky two-crust gluten-free pie dough. Then you can proceed with your favorite cherry pie recipe.
- Top a fruit dip. This cherry filling is the perfect topping for my creamy Cherry Cheesecake Dip.
- Make a cobbler. Follow the method for the biscuit-like topping in my Gluten-Free Peach Cobbler recipe, but use your homemade cherry pie filling in place of the peaches.
- Do cherry turnovers. I have a wonderful recipe for Gluten Free Apple Turnovers that you can use, but again, swap the apple filling for homemade cherry pie filling.
- As an ice cream topping. Skip the chocolate sauce and use cherry sauce instead to top your scoops of ice cream for a vibrantly colored treat!
- Serve as a sauce. If you want a sweet dessert sauce, this cherry pie filling will more than fit the bill. Spoon it over Gluten Free Cheesecake or swirl it into yogurt. It’s also amazing on Gluten Free Chocolate Chip Pancakes!

More Cherry Recipes
Homemade Cherry Pie Filling with Fresh or Frozen Cherries
Ingredients
- ⅔ cup granulated sugar (plus up to an additional 1/3 cup, if needed for less sweet cherries)
- ¼ cup cornstarch
- ¼-½ cup water (½ cup for fresh cherries, 1/4 cup for frozen)
- 6 cups fresh or frozen pitted cherries (about 2 pounds)
- 1 Tablespoon lemon juice for sweet cherries only, omit if using tart cherries
Instructions
- Add ⅔ cup granulated sugar and ¼ cup cornstarch to a medium saucepan. Pour ¼-½ cup water into the saucepan, (½ cup for fresh cherries, 1/4 cup for frozen). Whisk to combine.
- Add 6 cups fresh or frozen pitted cherries and 1 Tablespoon lemon juice to the saucepan and bring to a boil over medium heat, stirring constantly to dissolve the cornstarch and sugar and avoid burning.
- Reduce the heat to low and simmer for about 3-5 minutes, stirring constantly, until thickened. Carefully taste the filling (be careful, it will be very hot) and add additional sugar or lemon juice, to taste.
- Cool slightly to use as a topping or sauce, or cool completely to use in pies, cobblers, etc.

Did you make this?
Leave a star rating to help others know that they should make this recipe.
Share a photo and tag @cupcakesandkalechips on Instagram!