
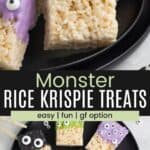
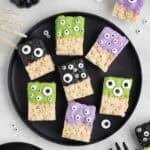
Halloween Monster Rice Krispie Treats


Get into the Halloween spirit with these festive Rice Krispies treats! Perfectly light and chewy and decorated as playful monsters, they’re such a fun addition to any spooky celebration. Boo!

Delicious Details
- Cuisine Inspiration: American
- Primary Cooking Method: Stovetop
- Dietary Info: Gluten-free option
- Skill Level: Easy
Looking for a fun and festive way to celebrate Halloween? These Rice Krispies treats are just the thing to bring some spooky cheer to the season. With playful monster decorations featuring wacky eyes and vibrant colors, these treats are sure to bring a smile to anyone who sees them.
But it’s not just the look that makes these treats special. Inspired by my classic Gluten Free Rice Krispies Treats, they have the same perfect light and chewy texture. Plus, they’re incredibly versatile—you can tweak the recipe to suit your taste or even decorate them for a different holiday! What are you waiting for? Grab your ingredients, roll up your sleeves, and dive into this edible arts and crafts project.
Reasons to Love These Halloween Rice Krispie Treats
I gotta tell you…I am obsessed with these (almost as much as my kids are!). Here’s why:
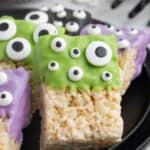
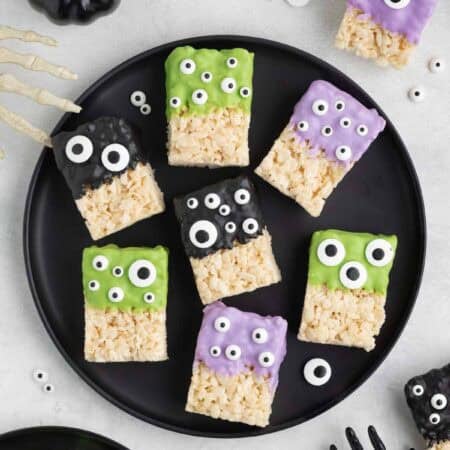
- A festive fave. These treats are such a fun way to get in the Halloween spirit. With colorful monster faces complete with off-kilter eyeballs, they’re sure to inspire smiles all around.
- Light and chewy. Some Rice Krispies treats are far too dense…almost tough. Not these! Thanks to a carefully thought-out recipe and attention to detail (see the section below labeled “Tips for Success”), these treats are wonderfully light and chewy. A real treat.
- Easily customizable. Whether you want to add a mix-in or two or decorate these goodies for a different holiday, there are so many ways to make monster Rice Krispies treats your own. Check out the section below titled “Variation Ideas” for inspiration.

What You’ll Need
Time to head to the baking aisle! Here’s what you’ll need for these spooky dessert bars. Have a look at the recipe card below for precise measurements.
- Unsalted butter – You can use salted butter, but I would use less (or no) sea salt later on.
- Mini* marshmallows – I usually opt for Kraft Jet Puffed Mini Marshmallows, but feel free to use a different brand. Note that marshmallows in the US are generally gluten-free. That said, there can be cross-contamination risks and certain ingredients you may want to be cautious around if you have a severe allergy to gluten. Learn all about it on my post titled “Are Marshmallows Gluten Free?“.
- Pure vanilla extract – The vanilla contributes a subtle warmth and depth to the flavor profile.
- Fine sea salt – Without it, these treats are overly sweet.
- Crispy Rice Cereal – Be sure to use a brand that is gluten-free. Kellogg’s Rice Krispies are NOT gluten-free. Check out my post titled “Are Rice Krispies Gluten-Free?” for more info.
- Candy Melts (various colors) – Not all Candy Melts are gluten-free, so it’s important to check labels carefully. For example, popular brands like Wilton don’t label their products gluten-free due to potential cross-contamination. However, options like ChocoMaker candy melts (labeled gluten-free) or white almond bark colored with oil-based food coloring can be great alternatives.
- Candy eyeballs – Be sure the candy eyes are gluten-free, as these fall into the category of sprinkles and carry cross-contamination risks (see “Are Sprinkles Gluten-Free?”). Sweets Indeed has a fully gluten-free “Eyeball Tacklebox” with various sizes that I love.
*No mini marshmallows? No problem. You can use regular marshmallows. You’ll need about 40 large marshmallows in place of the 5 cups of mini marshmallows.

How to Make Halloween Rice Krispie Treats
Ready to get cookin’? Here’s a quick look at how to make these Halloween treats. Be sure to scroll to the recipe card below for more thorough instructions.
- Prep. Line a 9×9-inch square baking pan with parchment paper and grease with cooking spray.
- Melt. In a large, heavy-bottomed saucepan or Dutch oven, melt the butter over low heat. Add the marshmallows and cook over low to medium-low heat, stirring consistently, until just melted. Remove from the heat.


- Flavor additions. Stir in the vanilla and salt.
- Add the cereal. Gently stir in the cereal.


- Cool. Gently press the cereal mixture into the pan and let it cool for 30 minutes.
- Cut. Cut the krispie treats into 12 rectangles.
- Melt the Candy Melts. Do so according to the package directions.


- Decorate. Dip the top half of each treat into the melted Candy Melts and press on the candy eyeballs to create a monster face. Place the decorated treat on a sheet lined with parchment paper and repeat.
- Set. Allow the Candy Melt coating to set before serving.


Tips for Success
For the perfect light, chewy, spooky Halloween Rice Krispies treats, follow these tips and tricks:
- Fresh is best. Fresh marshmallows melt MUCH more smoothly than stale ones. So, don’t use that months (years?) old bag of marshmallows in the pantry.
- Don’t overheat. Melt the marshmallows over medium-low heat and stir constantly to avoid overheating, as this can harden the sugars, making your treats tough.
- Stir gently. When stirring the cereal into the melted marshmallow mixture, do so gently and just until the cereal is fully coated. Over-mixing (or mixing too aggressively) can break the cereal and/or turn your treats tough.
- Grease ’em up. The marshmallow-cereal mixture should be VERY sticky. It is super helpful to lightly grease your hands (or a spatula) to prevent the mixture from sticking when you press it into the pan.
- Press gently. When pressing the marshmallow-cereal mixture into the pan, don’t press too firmly, as this can lead to dense, hard treats.
- Cool completely. Let the treats cool for at least 30 minutes before cutting. They will firm up during this time, allowing them to better hold their shape through slicing and decorating.
- Smooth ’em out. If the Candy Melts aren’t getting smooth enough, stir in 1/2 teaspoon of a neutral-flavored oil (vegetable or canola oil would be great) to help smooth ’em out.
- Smooth spreading. Rather than dipping the treats in the melted candies, you can use an offset spatula or the back of a spoon to spread and smooth the Candy Melts over the treats.
- Press and stick. Be sure to press the candy eyeballs onto the treats while the coating is still wet. Otherwise, they won’t stick properly.
How to Store
- Countertop. Store the decorated Monster Rice Krispie Treats in an airtight container at room temperature for up to 3 days.
- Freezer. Undecorated Rice Krispies Treats can be frozen for up to 3 months. Wrap them tightly in plastic wrap and place them in a freezer-safe container. Let them thaw at room temperature before decorating.
I would avoid refrigerating or freezing decorated treats, as those colder temperatures can cause condensation to form on the Candy Melt coating, causing them to appear blotchy. Additionally, the condensation can make the black pupils on the candy eyes runny.

Variation Ideas
I LOVE how easy it is to tweak these bad boys to make them your own. Here are a few ways to do it:
- Flavor boost. I love a classic Rice Krispies treat, but it can also be super fun to add a little extra flavor. Stir some peanut butter (~1/3 cup) into the butter-marshmallow mixture, or stir in ~1/4 cup cocoa powder when you add the vanilla.
- Thinner treats. If you’d like to use a 9×13-inch pan (as opposed to a 9×9), go ahead! Your treat will be thinner, but some people like that!
- Add a mix-in. If you’d like to mix some mini chocolate chips, M&Ms, chopped Oreos, or [insert your favorite mix-in here], go for it! Just make sure they’re gluten-free (if that matters to you).
- Pick a different holiday. If you’re coming across this recipe and want to try it, but it’s Christmas, not Halloween, adjust accordingly by dipping the treats in green Candy Melts and decorating like a Christmas tree! For Valentine’s Day, dip in pink and decorate with red and white sprinkles or heart candies. I’m pretty sure you could adapt this recipe to just about any holiday, come to think of it!

More Halloween Dessert Ideas
Looking for more spooky ideas for the dessert table this Halloween? Here they come!
Monster Rice Krispie Treats
Ingredients
- 6 Tablespoons unsalted butter
- 5 cups mini marshmallows (preferably Kraft Jet Puffed), divided
- 1 teaspoon pure vanilla extract
- ¼ teaspoon fine sea salt
- 6 cups Crispy Rice Cereal (be sure to use a brand that is gluten-free. Kellogg’s Rice Krispies are NOT gluten-free.)
- 2 cups candy melts , various colors
- Candy eyeballs , multiple sizes
Instructions
- Line a 9×9-inch square baking pan with parchment paper or aluminum foil and grease it generously with cooking spray or butter. You can also use a 9×13-inch baking pan, but your treats will be thinner.
- In a large, heavy-bottomed saucepan or Dutch oven, melt the butter over low heat. Add 5 cups mini marshmallows to 6 Tablespoons unsalted butter. Stir over low to medium-low heat until just melted (it’s fine if a few unmelted marshmallows remain). Remove from the heat and stir in 1 teaspoon pure vanilla extract and ¼ teaspoon fine sea salt.
- Add 6 cups Crispy Rice Cereal and gently stir with a spatula until the cereal is evenly coated.
- Transfer the mixture to the prepared pan and gently press down with your fingers or a greased spatula to spread it out and fill the pan, but do not pack it down tightly.
- Let cool at room temperature for at least 30 minutes.
- Cut the krispie treats into 12 rectangles by making 2 vertical cuts and 3 horizontal cuts into the large square.
- Line a baking tray with parchment paper.
- Melt 2 cups candy melts according to the package directions.
- Dip the top half of the krispie treats into the melted Candy Melts and press on the Candy eyeballs to create monster faces. Get creative with the placement and number of eyeballs on each treat to create unique monsters.
- Place the decorated treats on the parchment-lined tray and allow the Candy Melts to set before serving.
Did you make this?
Leave a star rating to help others know that they should make this recipe.
Share a photo and tag @cupcakesandkalechips on Instagram!