
Gluten Free Ladyfingers

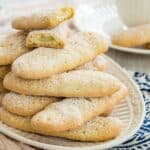


This is an easy recipe for Gluten Free Ladyfingers that anyone can make at home! These tender and crisp ladyfinger cookies are perfect to enjoy on their own with a cozy cup of coffee or tea. Or, use them in homemade desserts like gluten-free tiramisu!

Easy Gluten Free Ladyfingers Recipe
Lately, I found myself wrestling with a tiramisu craving. It got me bad. All I could think about was soft, crispy sponge cakes soaked in coffee liqueur and cream. Of course, a proper tiramisu calls for only one thing, and that’s ladyfingers! In my case, gluten-free ones.
So, I set out to make them. This easy recipe for gluten-free ladyfingers is perfect to use in gluten-free tiramisu. But if you’ve never had a sweet and tender ladyfinger cookie on its own, dipped in coffee or tea, you’re in for an experience!
These homemade ladyfingers are cloud-like on the inside and perfectly crisp on the outside. Whether you eat them as is, or turn them into a delicious dessert, you really can’t go wrong.
What Are Ladyfingers? What Do They Taste Like?
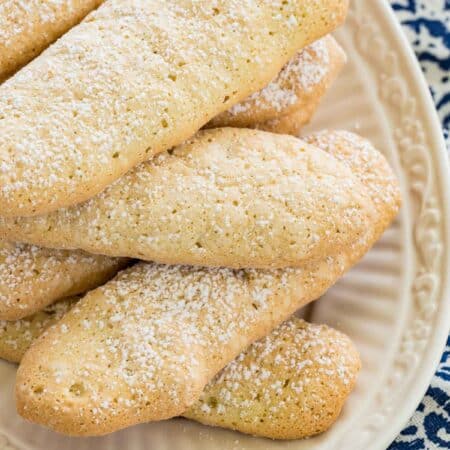
A ladyfinger is a kind of sponge cake biscuit that comes in a long, thin shape, a lot like a “finger.” They have a delicate, soft texture and mild, sweet flavor that’s perfect for soaking up syrups, creams, and puddings. This makes ladyfingers a favorite to use in recipes like tiramisu, though they’re also a delicious and light dessert all on their own.

Recipe Ingredients
There’s a little bit of baking science that goes into making the perfect light and fluffy ladyfinger biscuits. Especially when they’re gluten-free! It comes down to a few simple ingredients that together turn into something delectably light, airy, and scrumptious. Here’s a quick breakdown of what you’ll need:
- Gluten-Free Flour: I use Bob’s Red Mill 1-to-1 all-purpose gluten-free flour.
- Cornstarch: A bit of cornstarch in the batter helps to give these ladyfingers a tender, crumbly texture.
- Salt
- Xanthan Gum: Xanthan gum helps to bind the ingredients and thickens the batter in place of gluten.
- Eggs: You’ll separate three whole eggs, plus one extra egg white when making these gluten-free ladyfingers. Remember to take your eggs out of the fridge and let them come to room temperature so that they’re easier to mix.
- Sugar: I recommend using granulated sugar in this recipe for a light, fluffy texture.
- Vanilla: For the best flavor, be sure to use real vanilla extract instead of imitation.
- Cream of Tartar: This is added to stabilize the whipped egg whites in the recipe and for leavening.
- Powdered Sugar: Also called confectioner’s sugar, for dusting.
Make sure to scroll down to the recipe card for the full ingredient amounts!

How to Make Gluten Free Ladyfingers
You can have these ladyfingers ready to bake in the time that it takes to preheat the oven. To begin, set the oven temperature to 350ºF and get a baking sheet lined with parchment paper. Then, make the batter:
Sift the Dry Ingredients: First, sift the flour and other dry ingredients into a bowl and give it a mix. Sifting is especially important in this recipe as it removes any clumps for a fine, smooth batter.


Beat the Eggs Separately: Separate the egg yolks from the egg whites. Combine the yolks with sugar and whisk until the mixture is doubled in volume, then add the vanilla. Next, you’ll add cream of tartar to the egg whites and beat until they’re nice and fluffy. Add in the sugar, and continue to beat the meringue into stiff peaks.


Combine the Egg Mixtures: Fold a heaping spoonful of the meringue into the fluffy yolk mixture, then stir in the remaining meringue, being careful to not overmix.


Add the Dry Ingredients: Next, fold in the sifted dry ingredients from earlier until just combined. The goal is to keep the batter inflated and fluffy!


Pipe Out the Fingers: Once the batter is ready, scoop it into a piping bag. You can also use a gallon zip-top bag with a corner cut off, both will work! Pipe thick, 4-inch streaks of batter onto your lined baking sheet, leaving about an inch or so in between each “finger.”


Bake: Give the ladyfingers an even dusting with powdered sugar, then move them into the oven to bake. After 13 minutes, you’ll need to lower the oven temperature to 300ºF and continue to bake for another 15 minutes (give or take). The ladyfingers should be dry and crispy when you take them out to cool.


Cool and dust. Let your gluten-free ladyfingers set on the baking sheet for a few minutes before you move them to a wire rack to finish cooling. I can’t resist giving them a second dusting with powdered sugar at this point, but you do you!

Tips For Success
Here are my tips for perfecting these delicate gluten-free ladyfingers:
- How to Tell When the Meringue Is Ready: When beating the egg whites into meringue, an easy way to tell if it’s ready is to flip the whisk upside down. If the meringue peak pokes up without curling over, it’s good to go!
- Be Careful To Not Overmix: Make sure to gently fold together ingredients like the eggs and flour, and only mix until just combined. If your ladyfingers turn out a bit dense or chewy, this is likely because of an over-mixed batter.

Ways to Use Them
Gluten-free ladyfingers are a delicious sweet treat to have on hand, perfect to serve with your favorite desserts! Pair these with ice creams, custards, or a warm cup of coffee or tea after dinner. You can also use your homemade ladyfingers as a component in other desserts. Here are some ideas:
- Tiramisu: Soak these easy homemade ladyfingers in coffee liqueur and layer them with creamy custard and whipped cream to make classic Gluten-Free Tiramisu.
- Strawberry Shortcake: Layer ladyfingers in place of traditional shortcake biscuits to make an easy variation of Gluten Free Strawberry Shortcake.
- Icebox Cakes: Ladyfingers make a chunkier, sweet stand-in for cookies or Graham crackers in homemade icebox cakes.
- Ladyfinger Eclairs: Sandwich vanilla pudding between two homemade ladyfingers, then top with chocolate sauce and whipped cream.

How to Store Ladyfinger Cookies
The airy nature of these gluten-free ladyfingers means they won’t keep fresh as long as some other kinds of cookies. But they will last up to 3 days when stored airtight on the countertop.
Can I Freeze These?
Yes, ladyfingers can be frozen to keep them fresher for longer. Wrap them tightly in plastic wrap or store them airtight in a container or freezer bag. Thaw the lady fingers at room temperature and then enjoy or use them as you would normally.

Things You’ll Need
BAKING SHEETS: These sheet pans form Nordicware and my go-to. I have several in my kitchen and use the for cookies, roasting vegetables, and so much more.
PARCHMENT PAPER: The ladyfingers are tender, so if you want to make sure they don’t stick and crumble, lining your pans with parchment is essential.
PIPING BAGS: Using a piping bag will help you pipe evenly shaped and sized cookies.
DUSTING WAND: This handy little tool helps you dust a perfectly light coating of powdered sugar on the ladyfingers. You’ll also want to use this for dusting cocoa if you make that tiramisu.
Gluten Free Ladyfingers
Ingredients
- 1 cup gluten-free all-purpose flour (I use Bob’s Red Mill 1-to-1)
- 4 tsp cornstarch
- Pinch of salt
- ¼ tsp xanthan gum
- 3 whole large eggs plus one additional egg white
- ½ cup granulated sugar, divided
- ½ tsp vanilla
- ⅙ tsp cream of tartar
- Powdered sugar for dusting
Instructions
- Preheat the oven to 350°F. Line a baking sheet with parchment paper.
- In a mixing bowl, sift together the flour, salt, cornstarch, and xanthan gum into a separate bowl and mix together.
- Separate the eggs. Place the whites in a stand mixer or large mixing bowl and the yolks in a second mixing bowl.
- Add 1⁄4 cup sugar to the egg yolks and whisk until fluffy, light, and doubled in volume, about 4 minutes with an electric mixer on medium speed. Stir in the vanilla.
- Lightly whisk the egg whites to break them up. Add the cream of tartar and beat on medium-high until fluffy, then add the remaining 1⁄4 cup sugar in a steady stream and beat until stiff peaks form. Take the whisk out of the bowl and flip it upside down. You’re done when the meringue peak stands up without flopping over.
- Add a heaping scoop of the egg whites to the yolks and gently fold to combine. This lightens the yolks a big. Then slide the remaining whites into the yolks and gently fold until no streaks of white remain. Do not overmix.
- Add the dry ingredients and fold until uniform and combined, making sure not to deflate the mixture.
- Transfer the batter to a large zip-top bag with a corner snipped off or piping bag. Carefully pipe the batter on the prepared baking sheet, making thick lines about 4 inches long, leaving at least an inch of space between. Dust the ladyfingers with a light, even layer of powdered sugar (it’s ok if it gets on the baking sheet).
- Bake for 13 minutes, then reduce the temperature to 300°F and continue to bake for 12 to 15 minutes, until crisp and dry.
- Remove from the oven and cool for 10 minutes on the baking sheet before transferring to a wire rack to cool completely. If you like, dust with more powdered sugar.

Did you make this?
Leave a star rating to help others know that they should make this recipe.
Share a photo and tag @cupcakesandkalechips on Instagram!
Such a great recipe. My tiramisu was sensational. I prefer these ladyfingers to wheat store bought. Worth the extra effort & can freeze. I couldn’t buy GF in my area in Australia so I was forced to DIY…not that difficult.
Just wondering if I can use a natural sweetener such as maple syrup or coconut sugar. Also is it possible to is maple syrup in the tiramisu recipe? I bake for someone who does not tolerate white sugar.
Thank you!!
I have not tested those substitutions, but if I were going to try either, I would go with the coconut sugar. A liquid sweetener would change the consistency in both recipes and I doin’t think it would work out well.
If the 1to1 flour has xanthum gum can it be left out or is extra needed?
I add extra to make the dough more tacky and pipable, but you can try without.